Thursday, April 28, 2011

Brownies


 This formula makes a very rich fudge like brownie. For plating we cut it very small: 2"x 2" squares cut in half into triangles. Anything much larger then that would be too sweet and dense, not just for my tastes.


This formula is from the Michel Suas Book Advanced Bread and Pastry, A Professional Approach, Pg. 434
Yields: 1 sheet pan

100% Butter, 1 kg
74% Butter, cubed, 740 g
74% Eggs, 740 g
172.80% Sugar, 1.728 kg
0.80% Salt, 8 g
3.4% Vanilla extract, 34 g
100% Pastry flour, 1 kg
Total: 525%


MOP:
  • Sift flour and set aside until needed.
  • Melt chocolate in a double broiler, when the chocolate is more liquid add the cubed up butter.
  • Let the chocolate mixture cool down to 80° F - 90° F.
  • In a separate double broiler whisk eggs and sugar together, heat to 90° F.
  • Continue whisking egg mixture until it reaches a ribbon consistency.
  • Fold in the slightly cooled chocolate mixture into the egg mixture, off heat.
  • Fold in flour
  • Pan a sprayed sheet pan.
  • Bake at 325° F in a convection oven for approximately 30 - 35 minutes, it should feel firm to the touch. The finished brownie should look like it has a light coloured dull flakey surface which peaks out to a shinny glossy layer underneath.
  • Cool throughly before cutting.
  • Frost with boiled icing when the brownies are cooled. Use your offset spatula to spread the icing and to texture the brownie. You can use a different kind of icing; ganache is often used to garnish or top brownies.


Plating:
  • Cut, dragging your knife across for smooth lines, into 2" x 2" squares with your sharpened chefs knife. If the knife gets gummy then have a wet towel on hand so you can clean the blade before each cut.
  • Cut these squares in half diagonally, creating lots of triangles.
  • Place two triangles on top of each other on a clean white plate.
  • Use a squirt bottle with a sauce of your choice (chocolate sauce was used in this picture). At a 90 degree angle squirt a dollar coin sized circle. If you do not squeeze at a 90 degree angle you will not get a perfect circle.
  • Use a spoon to drag a leaf shape around the brownies. You can use the spoon to make dots after the line has stopped extending. 

Snickerdoodle Cookies

This is another bulk formula. This make up is a different method of making up the dough, a perfect one for freezing the dough for later use since it minimizes space needed to store the cookies.


This formula is from the Michel Suas Book Advanced Bread and Pastry, A Professional Approach, Pg. 417
Yields: 10# (makes approximately 3 ish 2# 10 oz. logs, each logs yields about 20 cookies)

80.88% Butter, 1.189 kg
99.26% Sugar, 1.459 kg
23.53% Eggs, 346 g
2.94% Vanilla extract, 43 g
100% Bread flour, 1.470 kg
1.18% Baking powder, 17 g
0.88% Salt, 13 g
Total: 308.67%


MOP: Creaming method
Shaping: Roll into 17" logs. Cut to 1/4" disks weighing about 2 oz each. Roll in cinnamon sugar before baking.
Bake: 350° F convection (approximately 10-12 minutes)

Oatmeal Raisin Cookies

This cookie is a very versatile sweet meets savory cookie. The types of raisins that you use can make the cookie sweeter or less sweet. You can also add zests to the cookie to add flavour.


This formula is from the Michel Suas Book Advanced Bread and Pastry, A Professional Approach, Pg. 415
Yield: 10# (approximately makes 80 cookies)
68.75% Butter, 607 g
145% Brown sugar, 1.281 kg
32.5% Eggs, 287 g
3.5% Vanilla extract, 31 g
100% Bread flour, 883 g
3.5% Baking powder, 31 g
1.75% Baking soda, 15 g
1.00% Salt, 9 g
85% Rolled oats, 751 g
72.5% Golden raisins, 640 g
Total: 513.5%


MOP: Creaming method
Shaping: drop cookies, 2 oz. each
Bake: 350° F convection (approximately 12 - 15 minutes)


Chocolate Chip Cookies - Bulk Production

This formula calls for bread flour instead of pastry flour, which is more typical for chewy chocolate chip cookies. Other then the fact that this formula is in a much larger batch then the formula that we did in beginning baking and pastries or from what you might do at home, its really not that different.


This formula is from the Michel Suas Book Advanced Bread and Pastry, A Professional Approach, Pg. 414
Yields: 10# (approximately. 80 cookies)
70.79% Butter, 775 g
44.21% Sugar, 484 g
52.63% Brown sugar, 576 g
31.58% Eggs, 346 g
1.58% Vanilla extract, 17 g
100% Bread flour, 1.095 kg
1.11% Baking soda, 12 g
1.68% Chocolate Chips, 1.211 kg
Total: 414.11%
MOP: Creaming Method
Bake: 350° F Convection (approximately 10-12 minutes)


Tuesday, April 26, 2011

Cake Doughnuts

This formula makes a cakeyer, though denser doughnut, it can be fried just like brioche doughnuts to give it a lighter texture and ultimate pleasing taste combination. Traditionally these doughnuts are finished with powdered sugar, cinnamon sugar, something light and complimentary. They are traditionally not filled.

Yields:
Butter, 8 oz.
Sugar, 14 oz.
Salt, 1/2 oz.
Non-fat dry milk solids, 3 oz.
Vanilla, 1 oz.
Whole eggs, 6 oz.
Egg yolks, 3 oz.
Cake Flour, 3 1/2#
Bread Flour, 1 1/2#
Baking Powder, 1.5 oz.
Water, 2 oz.


MOP: Creaming method
Combine butter, sugar, non fat dry milk solids in mixing bowl
Add liquid ingredients, add water. Mix to combine.
Add flours and levening agents and continue to mix on first speed until combined. The dough should look very sticky and a little bit wet. Fold out the dough onto a well floured surface, bench the dough for 45 minutes covered.

Pre shape the dough, using a generous amount of flour to help keep the dough from tearing on the counter too much. Let the dough rest for 30 minutes before rolling out and cutting the dough.

Roll out the dough to 1/2" thick. Cut in shapes, similar to the method for brioche doughnuts. Let doughnuts proof for 30 minutes before cooking in the fryer.

Sunday, April 24, 2011

Brioche

Brioche is a very versatile soft dough. In the past, in Beginning Pastries, we've done things like buns, brioche a tĂȘte, bread pudding, pain perdu, and made up recipes for a sweet "breakfast pizza". These two make ups are a few more applications that you can make out of Brioche; Brioche aux chocolat, brioche aux raisins, fried doughnuts, cake-y doughnuts (this one will be in a separate entry because it has a separate formula). Other popular ways of making up brioche is toast point and en croute (encrusted, like the Russian dish Coulibiac).


Formula: yields #42
77.19% Bread Flour
22.9% High Gluten Flour
8.3% Water, cold
49% Eggs, cold
2.5% Salt
12.5% Sugar
4.8% Fresh yeast
50% Butter, cold

MOP: Intensive mix
DDT: 72° F
First fermentation: 1 hour
Divide: 1#
Preshape: Light boule
Resting time: 30 minutes
Shape: varies


Brioche Aux Chocolat

  • Roll out 1# of dough to approximately 8" x 10" (essentially 8" by whatever length)
  • Spread a thin layer of cream, about 1/8" thick. A flavoured pastry cream is a very good choice for the filling, spread it a little over half of the sheeted out rectangle. Even the layer out.
  • Spread or sprinkle chocolate chips over the pastry cream.
  • Fold the rectangle in half, making a 4" by whatever length rectangle. Stretch the dough out to make two even halves, press down to seal both layers together.
  • But 1 1/4" strips all the way across.
  • Place strips on parchment lined sheet pan. Press the strip down leaving an imprint down the middle.
  • Egg wash and final proof for an hour, or until ready.
  • Bake 

Brioche Aux Raisins
  • Roll out 1# of dough to approximately 8" x 10" (essentially 8" by whatever length)
  • Spread a thin layer of cream, about 1/8" thick. A flavoured pastry cream is a very good choice for the filling, spread it a little over half of the sheeted out rectangle. Even the layer out.
  • Sprinkle rehydrated raisins over the cream portion.
  • Roll together like a cinnamon roll, or jelly roll.
  • Cut 1" thick strips.
  • Place strips facing up on a parchment lined sheet pan, make sure to tuck the loose end underneath the roll. Very much like you would do for cinnamon buns.
  • Wet your fingers and press the outer ends down, open the shape up. It will resemble a piped rose shape.
  • Egg wash revealed dough areas and let proof for an hour, or until done proofing.
  • Bake at 


Brioche Doughnuts

The make up for doughnuts are really as limited as your imagination. You want to try to keep the sizes and weights the same so you can charge the same amount. But aside from that there are a few recognized styles: long john, circle, circle with hole punched out, munchkin sized holes. There are also a lot of different fillings and glazes and finishes and garnishes that you can use for the doughnut; sugar, glazed, flavoured icings, ganache, garnishes.
  • Portion 1# brioche dough for approximately five 3 oz.  doughnuts.
  • Sheet dough to 1/2" thick
  • Use cutters (3" is a good circle size) or a chefs knife to cut your shapes
  • Dock the dough if you desire, this step is not necessary though
  • Proof dough for 1 hour
  • Cook in clean frying oil, 360°-370°
  • If you are going to dip in cinnamon and sugar dip right after you take it out of the fryer. Fill doughnuts after they cool. Glaze either hot or cool.

Thursday, April 21, 2011

Strudel

Strudel is a very soft dough that is very easy to mend, and also easy yet challenging to stretch out. It gives a light final product that resembles philo dough, and because of the process can be considered a very loosely modified laminated dough. This is a dough that does not have any yeast in it.

Yields: 40 oz. (about 4 full sized strudel logs)
100% Bread Flour, 23.14 oz
50% Water, 11.55 oz
12.5% Eggs, 2.8 oz
8.3% Oil (flavourless), 1.92 oz
2.1% Honey, 13.6 g
0.7% Salt, 4.5 g
Total: 173.16%


MOP: Straight dough method
  • Mix all ingredients in a bowl until fully combined. 
  • Pull dough off and let rest in an oiled, covered, bowl for an hour.
  • When the dough has rested, portion 10 oz pieces.
  • Take each 10 oz piece and stretch it over a cloth covered bread board. Use your knuckles to stretch it gently, like you would stretch a pizza dough by hand. If parts tear then you can patch it up, but be careful not to let the dough stick to itself. The edges should have more dough then the middle.
  • Cut the edges off so that you are left with a very thin, see through dough.
  • Dock the dough if you are filling with a liquid based filling (like a cheese filling) otherwise you will get a lot of blow out.
  • Fill the strudel on one side sparingly.
  • Pick up the cloth and roll the dough over the filling, continue to roll the dough up to the end.
  • Prepare a lined sheet pan so you can roll the dough off the cloth onto the sheet pan.
  • Bake at 
Fillings: You can fill strudel with all sorts of fillings. Different variations might include cinnamon sugar, fresh apples tossed with spices and panco, ricotta cheese, bakers cheese (bark). To make an apple filling you would want to slice the apples thinly and toss it with panco (bread crumbs) to act as a starch, or binding agent. If you have cake crumbs you can use this as well, but make sure you decrease the amount of sugar added if you choose to use cake crumbs. Add desired spices, panco, and sugar to taste.

Columba Di Pasqua

This is a very sweet and very rich Easter holiday bread that originated in Italy. It is traditionally shaped into a cross shape. In addition to egg and butter in the formula it is also flavoured with candied orange peel, almond paste, vanilla, and then dusted with sugar after baked. This dough is also very intensively mixed. With a preferment (Italian levain), a first dough, and then a final dough. This is a very delicious bread but does require a lot of inactive labour.


This formula is from the Michel Suas Book Advanced Bread and Pastry, A Professional Approach, Pg. 369
Yields: 1844.40 kg


Italian Levain*
DDT= 85°F
Fermentation Time: 4 hours (minimum)
100% Bread Flour, 123 g
Mixing First Dough
50% Water, 62 g
100% Starter, 123 g


First Dough: 
DDT= 85°
Fermentation Time: 3 hours
100% Bread Flour, 985 g
40% Water, 394 g
25% Egg yolks, 246 g
37.5% Sugar, 369 g
37.5% Butter, 369 g
Italian levain, 31.30% 308 g
0.20% Instant Yeast, 2 g


Final Dough:
100% Bread Flour, 246 g
18% Water, 44 g
Incorporated First Dough
100% Egg yolks, 246 g
75% Sugar, 184 g
50% Honey, 123 g
4% Salt, 10 g
150% Butter, 369 g
10% Cocoa butter (in small pieces), 25 g
1087.40% First dough, 2.674 kg
1 1/4 Vanilla bean
1 1/4 Orange zest
200% Candied orange peel (small dice), 492 g
50% Almond paste (frozen and in small pieces), 123 g
Total: 1844.40%


*The levain is a stiff, more stiff then pat fermentĂ©,  preferment. Its toughness helps give strength to a high sugar and high tenderizer dough like this one.


Developed Final Dough
MOP: Intensive Mix
DDT: 78°F


Italian Levain:
  • Mix Levain the night before. Mix all ingredients until combined. Like you would mix a pat fermentĂ© dough.


First/Intermediate Dough:
  • Combine all ingredients in mixer. Mix on first speed until ingredients are incorporated, roughly 4 minutes.
  • Cover and let rest for 3 hours at 85°F.


Final Dough:
Add zest, honey, vanilla, flour, salt into mixing bowl. Mix ingredients, add water as necessary to hydrate the mixture. Mix until ingredients are hydrated and come together. Scrape down as needed.
When the ingredients are combined, alternate adding egg yolks and sugar in three stages. Mix until it is homogenized.

Increase to second speed until the gluten is fully developed; you can pull a windowpane with little to no gnarls in it. This should take a while because of all the tenderizers and fat in this formula. The dough will look very shiny and the windowpane will be really easy to make.

Add butter in sections/pieces, continue mixing in second speed while adding butter.
Add cocoa butter, candied orange peel, frozen almond paste in first speed until incorporated.
Pull dough off and place in oiled covered bin.
Retard for 30 minutes and then fold. The dough is still really soft so it can be folded easier in the bin.
Retard dough for another 30 minutes.

Portion dough to 500 g pieces.
Pre shape in a round. Let bench rest for a few minutes before final rounding into a greased mold.
Retard at room temperature for 7 hours (or overnight in the refrigerator).


If you let the dough sit in the refrigerator over night let it come to room temperature and then finish proofing for 2-3 hours. Bake the Columba Di Pasqua at 


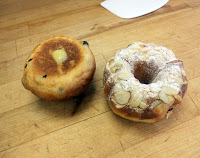
    Kugelhopf

    This recipe is like a hybrid between a bread and a cake. The sweet dough can be made up however you want, creating a very versatile sweet product. The sponge is almost like a poolish in that it is a very liquid heavy preferment, it aides in softening up the dough (the amount of milk and butter and eggs also aide to this soft dough) giving the dough an additional lift. Traditionally this is a winter holiday bread.

    This formula is from the Michel Suas Book Advanced Bread and Pastry, A Professional Approach, Pg. 374
    Formula: yields 15 kg


    Sponge: 37%
    100% Bread Flour, 2.22 kg
    60.14% Water, 1.335 kg
    0.10% Yeast, 2 g


    Final Dough:
    100% Bread Flour, 3.78 kg
    32.25% Milk, 1.925 kg
    15.4% Eggs, 924 kg
    1.49% Osmotolerant Instant Yeast, 87 g
    1.98% Salt, 119 g
    16% Sugar, 960 g
    28 % Butter*, 1.68 kg
    30% Raisins, dark and golden, 1.8 kg
    6% Rum, 360 g
    Total: 250.12%


    *If a recipe calls for more then 20% butter as in this formula it indicates that it will be a soft dough. Butter that is over 20% will be added after the dough is fully hydrated.


    MOP: Intensive Mix
    DDT: 72° F
    Approximate mixing time: 30 minutes
    • Add flour, milk, eggs, yeast, salt, sugar into the mixer. Mix on first speed, adjusting the liquid if necessary until the dough is fully incorporated and hydration looks correct.
    • Scrape the dough down and add the sponge into the mix. Mix on first speed until incorporated and then increase to second speed.
    • When you can pull a intensive mixed window pane out of the dough put the dough back into first speed and add the softened butter in small bits. The dough will look like its pulling apart when the butter is incorporating. Continue mixing until the chunks of butter are not visible.
    • While this is mixing you can soak your raisins in the rum. If you have a flavourful rum you can soak the raisins longer. Strain the raisins before use.
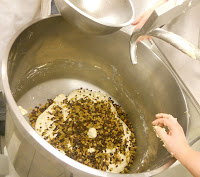
    • Add raisins into the developed dough. Incorporate on first speed in reverse, if that is an option for your mixer.
    • Pull the dough off and let proof for 30 min to and hour.
    • Portion the dough to 18 oz (453.6 g) for a large mold, 60 g (2.11 oz) for a small individual mold.
    • Round the dough, bench the dough covered for 30 minutes.
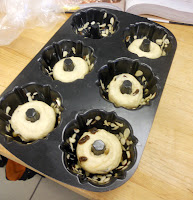
    • Butter your molds and sprinkle sliced almonds on the bottom if you desire.
    • Final shape the dough into tighter rounds. If your mold is a traditional kugelhopf shape (looks like a fancy shaped bunt pan) press your finger through the dough draw out the hole a little bit and fit the dough, seem side up, in the mold.
    • Proof for roughly 45 minutes, or until your finger leaves an imprint.
    • Bake at


    Wednesday, April 20, 2011

    Danish Shaping

    Danish come in a lot of different shapes and sizes, but can be cut from the same dough. Important things to remember when choosing the shape is that the dough is delicate. You want to cut the dough with a rocking motion so you do not tear the layers that have been created during lamination.


    Small Shaped Danish
    These are probably the most popular forms of danish. These shapes all usually start out from a 4" square but can start with a 4" circle if you want: a pinwheel, the traditional circle, an hourglass shape, a spectacle or eye-glasses,  a twist, bear claw, vol-au-vent are probably the most traditional forms. The small shaped danish can be baked at 370° in a convection oven for 10-12 minutes.

    Pinwheel:
    Start with a 4" square. From the corners make notches towards the center but not into the center. Egg wash the center. Start from the same side of the notch, fold the corner into the center, pressing down. Move to the next center, continue all around the square.

    Bear Claw:
    Start with a 4"square. Pipe a line of cream (almond cream for instance) along the top of the square. Egg wash a line along the top of the square. Roll up the square tightly, like you would for a cinnamon bun. Place the rolled up shape, seem down in the "back" of the roll. Make 4 equal cuts to give 5 claws in the shape. Fold the roll in a "U" shape cut portions facing out. Egg wash and place sliced almonds on top. Proof before preparing a second egg wash, and baking.

    Danish Twist:
    Start with a 4" square. Spread a thick flavour filling like jam or almond paste or cinnamon sugar thinly across half of the square. Fold the square into a book so its now 2 x 4". Cut a hole down the middle of the book. Open the book up, widen from the center, push the bottom in through the center hole creating a twist shape. Egg wash the form and allow to proof. After proofing, before baking you can fill the top of the danish if you choose before baking.


    Vol-au-vent:
    Start with a 4" square. Fold into a triangle, like the first step in folding an oragami crane. Cut two lines 1/2" from the square edges, leave the center intact/attached. Unfold the square and egg wash along the inside of the cuts. Fill the center (you can also opt to fill the center after you take the next step). Fold the "open" ends over the filling and press down on the opposite side.


    Traditional Danish Make-up:
    Start with a 16" wide rectangle, the length is not necessarily important. Egg wash half of the dough, sprinkle with cinnamon and sugar and spices. Fold the rectangle in half, 8" by x". Cut 1/2" sections along the length of the strip. When you have your 8" by 1/2" sections take each one and loosen or lengthen the strips by taking each end in your hand. Place the strip on the table and take your hands in different directions to twist up the section.

    Coil up the strip in one of the following shapes:
    Circle: Coil the strip in a loose circle, tucking the tip underneath. (This is a good shape to make an "eggs over easy" danish using an apricot as a garnish)
    Eyeglasses: Coil both sides in, loosely, meeting in the middle.
    Hourglass: Coil both sides loosely in opposite directions.


    Large Shaped Danish

    Large shaped danish are not as common but they can be very eye appealing as well as much more inviting for shared events or for edible decoration for an event (as in a wreath, or nest shape). With large shapes you will want to start out with a 8" wide by whatever length for your strip. Large danish shapes are baked at a lower temperature for a longer time. Bake at 350° F in a convection oven for roughly 20 minutes.


    Danish Plait: open or closed
    Open ended plait: Fold the 8" side over so that you have a 4" by whatever length book. Make 2" deep cuts on the open side, all the way down the length of the pamphlet. Open the "book" back up. Fill the center leaving a 1/2" barrier on either side. A cooked fruit filling is a really good choice for this shape because it gives an additional height or dimensions to the dough. Fold flaps over into the center and press down into the dough, the first one needs to be folded in at an angle. Egg wash the flap after you press it into the dough. Alternately fold flaps in all the way to the bottom. Press in the sides to straighten the finished plait, egg wash the entire plait.

    Closed ended plait: Cut a large end piece and angle in the corners on both sides length wise. Fold up as you do for the open ended piece.


    Danish Twist:
    Do not fill this with something that moves a lot. Fruit fillings are not recommended, but cream cheese filling, almond paste, or jam are all really good options.
    Cut the strip to 8" wide. Spread a thin layer of filling, leave one end though with little or no filling. Roll the shape right like a cinnamon roll. Set down the shape (on a sheet pan) with the seem in the center. Make a cut down the center starting about 2" from the top. Twist the two sides and then press in the ends. Cut the end that was intact and continue to twist. Leave as a line or make up as a circle.

    Pull Apart Wreath:
    Cut the strip to 8" wide. Spread the dough with jam and roll up like with the danish twist. Place the dough down with the seem down like you do for the bear claw. Cut 1 1/2" pieces just like with the bear claw. Fold the shape (on a sheet pan) into a circle. When placing the pieces down flip each section up and place the next piece on the last.