Showing posts with label Assembled. Show all posts

Sunday, February 20, 2011

Raspberry Passion-Fruit Mousse Cake

This cake can be made with any combination of fruit flavours. The only things you want to be careful about is that your fruits compliment each other, and that you choose a colour for your stencil paste that compliments the fruit flavours in your cake. So if you are going to make a
raspberry passion-fruit cake for instance, it doesn't matter how much of a Mets fan you are should probably do not want to have the sides of the cake be orange and blue.


Formula: yields one 8" cake
One half sheet pan (2#) Ribbon Sponge
One 7" disk (11 oz.) passion-fruit flavoured Gelée
34.88 oz. Raspberry mousse
4.5 oz. Passion fruit glaze
2 oz. White chocolate pate a glace

Tools: 8" charlotte ring, 8" and 9" cake card, genoise pan or 7" template, 9" acetate, spatula, pastry brush, offset spatula

MOP:
Prepare and bake your ribbon sponge. Cool completely.
Prepare your gelée and freeze to set up.

Use a template or the bottom of a genoise pan to cut a 7" circle out of your prepared ribbon sponge. Leave enough room so you can cut out two strips, about 2" wide. Use the side of your charlotte ring as a guide for cutting the strip, this is going to be the side of your cake and you want to be able to see a layer of mousse on the top of the cake.
Use your pastry brush or offset spatula and cover the bottom of your 7" circle generously with a layer of white chocolate pate a glace. Refrigerate this to harden the chocolate.


Place the 7" cake chocolate side down on an 8" cake card. Line your charlotte ring with acetate and place this on the cake card too. Use your two strips, decorative side facing the acetate, to make a wall for the cake. If the strips are too long, trim them so that there are no overlaps or holes in the walls. Set aside.

Prepare the raspberry mousse. Fill the mold half way with mousse.
Place the frozen gelée on top of the mousse. Fill the rest of the way with mousse. The mousse should go higher up, about 1/2 and inch, then the cake. Freeze to set up.

While the mousse is setting make your glaze. Cool the glaze slightly and pour over the mousse. This should firm up immediately. Freeze to set completely.

Friday, February 18, 2011

Banana Mousse Cake

This is a really nice, seemingly healthy dessert. It has a lot of different textures and layers that really work very nice together.


Formula:
1# 15 oz.  Banana mousse
Dacquoise,  7" circle and 8" circle
Pate a glace (melting chocolate)
16 oz. Chocolate meringue (you will have extra, but its good to have extra incase some are broken)

Tools: 8" charlotte ring, 8" and 9" cake card, 9" acetate, brush, spatula, chefs knife


MOP: assemble
Make dacquoise, pipe the batter into two circles one 7" and one 8". With the extra batter you can pipe cookies. Bake and let cool. Before the cake gets hard use a 8" charlotte ring to make sure your 8" cake is still 8". If it isn't cut the edges so that you have a 8" cake. Set aside and let cool completely.

Make Chocolate meringue and pipe into strips the size of the short end of a sheet pan. Pipe the strips/sticks at least a finger width apart. Get as many strips as you can out of the batter, as some of them will break when you assemble. If you have extra batter you can use the batter to pipe more cream puff shaped cookies. Bake and let cool completely.

Prep your cake before you make your banana mousse. Brush pate a glace over the bottom of your 8" dacquoise cake, make sure you are brushing the non textured side. Let the chocolate set up in a refrigerator or freezer. Flip the cake over on a 8" cake card so that the chocolate is on the bottom. Line a 8" charlotte ring with acetate and place this on the 8" cake card. Set aside.

Make your banana mousse. Fill the cake half way with banana mousse. Place the 7" dacquoise cake on top of the mousse, try to get it as center as possible. Fill the rest of the mold with the banana mousse. Even out the top of the mousse with a flat edge or an offset spatula, you can also jiggle the mold slightly to get it even. Chill the mousse until set.

While this is setting, when the chocolate meringue is finished baking and cooled; cut the chocolate meringue sticks down to approximately the height of your cake. All of the sticks do not have to be the same size but should not be too much taller then the cake.

When the mousse is set un-mold it, carefully. Take the acetate off. Start placing the chocolate meringue sticks around the mousse, sticking the sticks to the mousse so it stays in place. Continue this all the way around until the cake is completely covered. You can dust the top of the cake with cocoa powder if you desire.

Sunday, February 13, 2011

Gâteau St. Honoré

This is a really nice cake, light looking but with a lot of components to it that make it taste quite rich and balanced. It also incorporates a lot of different elements to build it so it is a nice practice of varying techniques.

Formula*: yields one 8" cake
20 oz. Blitz puff pastry
1# 8 oz. Pâte à Choux (you will have extra)
3# 4 oz. Pastry Cream**
10 oz. Whip cream
4 oz. Caramel

Tools: large piping bag, 804 tip, heat resistant spatula, whisk, docking tool or fork, brush, St. Honoré tip, sauce pan, mixer, stainless steel bowl, 8" cake card, 8" charlotte ring
*This formula is modified from Gisslen, Professional Baking Ed. 5, pg. 367
**Full recipe of pastry cream in Gisslen, Pg. 271


MOP: assembled
Make and cool Pâte à Choux. You want the Pâte à Choux to be at room temperature so you can pipe it. Make sure that you cover it with plastic, touching the paste, so that a crust does not form. Can be chilled or cooled at room temperature.

Dust your work table generously with bread flour. Roll out the puff pastry, turning often so that the butter does not stick to your table, to the 1/8" thick. Make sure that the pastry is rolled out large enough to fill a 8" ring. Use a docking tool (or a fork if you dont have a docking tool) to mark the pastry generously. With the docking tool roll horizontally and vertically. Let the pastry rest for a minute so it will better hold its shape.


Use the 8" Charlotte ring and press down, like a cookie cutter, in the docked puff pastry. Transfer your 8" puff pastry circle onto a parchment lined sheet pan.
Using your 804 tip and piping bag, pipe a thick circle of Pâte à Choux around the edge of the puff pastry circle, about 1" thick band. Pipe a smaller circle of Pâte à Choux creating a bulls-eye look on top of the Pâte à Choux.

With the remaining Pâte à Choux use your 804 tip and a piping bag, pipe small 3/4" cream puff (also called Profiterole) style bulbs with the Pâte à Choux. Make at least 14. With the extra Pâte à Choux pipe extra cream puffs or Éclairs.

Bake at 400°F in a convection oven until it has risen and turned golden, drop the temperature to 275°F and continue baking until it has a uniform golden colour and the cream puffs sound hollow when tapped.

Cool completely.

While this is cooling you can make your whip cream (8 oz. cream, 1.6 oz. sugar, dash of vanilla) Whisk it to a medium peak. Chill until you are ready to use.

Make pastry cream and cool to room temperature.

When puff pastry and cream puffs are cool place the puff pastry circle on top of a 8" cake card. Set aside.

Using the same technique for filling Éclairs fill the cream puff balls with pastry cream. Set aside any Éclairs you might have made and pipe them with any extra pastry cream after you've made the cake.

Make caramel, heat to a golden colour. When caramel is heated turn off heat but keep the saucepan on the burner so the caramel stays warm and liquid. Hold a cream puff from the bottom and dip in caramel, use the cream puff to "glue" the cake to the 8" cake card with the caramel. Set this cream puff aside, caramel side up to use as garnish.

Use this same method to place filled cream puffs around the cake. Place each bulb about 1" apart around the cake symmetrically. To do this, dip the cream puff in caramel and then dab the cake with caramel, carefully turn the cream puff over and glue down on the cake so that the caramel is facing up.


Pipe or fill the center of the cake generously with pastry cream, leaving a thicker amount in the middle to form a hill like shape. The pastry cream should be as high as the bottom of the cream puffs around the outside. If the extra pastry cream has stiffened up slightly use your spatula to smooth it out a little bit.

Using your St. Honoré tip with your piping bag piped a decorative
cursive "L" design down the top of the cake. Make sure the decorative part of the tip is facing up. The colder the whip cream the stiffer your lines are going to be.

Pipe a ridge between each cream puff, around the sides of the cake.

Place an extra caramel dipped cream puff in the center of the cake for garnish.

Saturday, February 12, 2011

Éclairs and Cream Puffs

Formula: yields 1# 8 oz. (about 40 Éclairs)
1# 8 oz. Éclair paste (pâte à choux)
1 1/8 qt. Pastry cream
8 oz. Chocolate ganache

Tools: piping bag, 804 tip, parchment paper, spatula or bowl scraper, calm and patience

MOP:
Fold a parchment paper in fourths, length wise. Unfold and lay this as flat as you can on a sheet pan. Fill your large piping bag with Éclair paste and paste down the corners of your parchment. Using your 804 tip and a large piping bag (at least a size 14) pipe "fingers" diagonally leaving about 2" space between each finger. Use the same motion for Langue du Chat cookies or for individual lady fingers as you would for Éclairs. If you have a tail on your Éclairs wet your finger with water and press the tail in.
They should be the length of 1/4 of the pan, 3-4 inches, and should be about 3/4" wide. Pipe them diagonally and stagger the next row.


Bake at 400°F Convection until they turn golden. Drop the oven temp to 275°F and let bake until the bottoms and the tops are the same golden colour.

In a deck oven/conduction oven you want to bake it at 400-425°F and then drop it to 300°F. You want to set the deck oven at 6-10-10.

Let cool completely before filling.
When cooled. Turn the Éclairs over and poke two holes in the bottom. You can also poke holes on either end but you will not be covering the holes and for presentation it looks cleaner to have holes on the bottom where the customer can not see them easily. Make sure your pastry tip can fit snug in the hole.

Fill your pastry bag with pastry cream. Keep filling until you feel the cream come out the other end, or the end you are piping in from. If you feel the Éclair start to give, stop immediately and proceed to fill from the other end.
Refrigerate (this step is optional. It makes it easier to dip the Éclairs, and if you are not serving them immediately it will preserve the moisture in the product to glaze it before service).

When you are ready to serve the Éclairs, hold the bottoms and dip the top into ganache. You want to only have a thin strip down the
top, so you can still see the shape and all the sides of the Éclair. Wipe off any excess chocolate so nothing is dripping down, you can also use your finger to patch up any holes in the chocolate. Let the chocolate dry and serve.

Unfilled and uncut Éclairs can be held in the refrigerator for one week, can crisp up in the oven before use.


Cream Puffs:
Line sheet pan with parchment paper. Paste down ends if baking in a convection oven. Using an 804 tip, pipe dollar coin sized round mounds of dough, about 1 1/2" in diameter. To do this apply steady pressure until you reach the size mound that you intended, stop pressure and cut off in a quick circular motion to create the smallest tail possible. Wet your finger and press in any "tails" made from piping.

Bake at 400°F Convection until they turn golden. Drop the oven temp to 275°F and let bake until the bottoms and the tops are the same golden colour.

Sunday, February 6, 2011

Cheesecake

Formula*: yields 2 - 8" cakes
2.5# Cream cheese, room temp
14 oz. Sugar
0.75 oz. Cornstarch
3.5 g. Lemon zest**, grated
0.25 oz. Vanilla extract
5 g. Salt (aprox. 1/2. tsp)
8 oz. Whole eggs
3 oz. Egg yolk***
4 oz. Heavy cream
2 oz. Milk
1/2 oz. Lemon Juice
6 oz. Graham cracker crumbs****
3 oz. Sugar
3 oz. Butter, melted

Tools: mixer, spring form pan (or cake pan lined with parchment paper), rubber spatula

*adapted from Gisslen, Professional Baking Ed. 5, pg. 528
**lemon zest will dry out if you do not combine it with something else.
***can combine with whole eggs
****adapted from Gisslen, Professional Baking Ed. 5, pg. 290


MOP: assembled
To make Graham cracker crust take crumbs, sugar, and melted butter and mix on low with paddle attachment until all the ingredients are fully combined and slightly moist. Press crumbs into the bottom of your springform pan. If you are using a cake pan make sure it is sprayed and that a parchment circle is sprayed on the bottom of the pan. Bake for 5 minutes in heated oven (temperature does not matter) or until the moisture in the crumbs has dried out and are hard. Set aside.

In mixer break down cream cheese with paddle attachment. Stop mixer to scrape down as necessary. You want the cream cheese to be soft and at a spreadable consistency. When softened add zest (and lemon juice) to cream cheese. Move mixer to slow speed and add in sugar. When sugar is incorporated increase to medium speed. Continue mixing to get out lumps. Stop mixer to scrape down bowl as necessary. Pour in eggs in stages. Mix until smooth. When mixture is smooth decrease to low speed and add cornstarch, milk, and cream.

If your mixture is still lumpy run it through a sieve. Pour into two pans. Can be baked in a water bath, but is not necessary. Water baths, for cheesecake, aides in browned tops and unbrowned sides.

Bake at 320°-325°F deck oven with settings 0-10-10 for 12-15 minutes, or until the center is not jiggling and the sides have separated slightly from the pan sides.

Cool the cake before refrigerating or freezing to set. Let set and chill before serving.

Crème Caramel

This is a very simple and elegant looking baked custard. Easy to make for a dinner party as it requires you to let it set up under refrigeration for the caramel to dissolve and form a sauce when you plate it.

Formula*: yields 8 - soufflé cups
about 30 oz. Crème anglaise
1 oz. Water (1T extra water on hand)
3 oz. Sugar

Tools: White bowls for presentation, soufflé cups, saucepan, white heat resistant spatula, stainless steel bowl, plastic wrap, large flat pan for water bath

*This formula is from Gisslen, Professional Baking Ed. 5, pg. 523


MOP: assembled
First thing you will want to do is grab your soufflé cups, set them aside but on hand and make the caramel. In the sauce pan heat up the water and sugar, do not stir until the mixture reaches a golden colour. Use your spatula to check the colour of the caramel. When the sides start to have slight colouration gently stir the caramel and clean down the sides. Remove from heat and use the extra 1T of water to cool the caramel. Make sure the saucepan is away from your body as the steam and caramel can harm you. Stir to combine liquids.
Immediately pour the caramel into the bottom of the molds, you want a very thin even sheet on the bottom. About 2-3 tablespoons in each cup.

Let the soufflé cups sit and let the caramel harden.

When the caramel has hardened pour prepared, and cooled, crème anglaise to the top of the soufflé cups.

Bake in a water bath at 300°F conduction (0-10-10 deck oven settings), 250°-275° convection oven with cover. Approximately 30-45 minutes. Check for doneness, the custard will not jiggle when touched.

Let cool for at least 24 hours for chill in a blast cooler.
When you are presenting, press the top of the custard with your fingers to release from mold. Flip over onto a white plate or bowl, the caramel will have turned into a sauce and will mostly fall on the plate. You should see a clean white custard on the sides.

Bread Pudding

Formula:
Half of a baguette, or equivalent amounts of sweet breads
Roughly 20 oz. Crème Anglaise

Tools: bread pan, larger pan


MOP:
Slice bread into half slices or small cubes. Arrange the bread slices so they over lap in pan.
Pour the prepared crème anglaise over the bread in the pan. Let stand, refrigerated, for an hour so the bread fully absorbs the liquid.
Set the pan in a larger pan containing about 1 1/2 inch of water (have the water bath go up to half the height of the custard).

Place in a preheated oven: 300 °F deck oven/conduction oven, without rack, 0-10-10 setting with dampers open. 250°-275°F convection oven with a cover when baked. Approximately 40 min to 1 hour.

Let cool before serving. Serve either cold or at room temp.

Saturday, February 5, 2011

Crème Brûlée

This crème brûlée formula honestly wasn't my favourite. And I'm also not a huge fan of crème brûlée... But non the less it does use a cold infusion technique that is quite simple to make. So if you are in a pinch for an easy dessert this is it.


Formula*: yields approximately 6 - 5 oz. portions
6  Egg yolks
3 oz. Sugar (have more on hand for garnishing)
24 oz. Heavy cream, hot
0.125 oz. Vanilla extract (3/4 t)
3/8 t  Salt (you can kind of eyeball this to be just a tad more then 1/4 t)

Tools: Soufflé cups, large stainless steel bowl, spatula, whisk, ladle or scoop if desired
*This formula is adapted from Gisslen, Professional Baking Ed. 5, pg. 524

MOP: Cold infusion
In a large mixing bowl whisk egg yolks and sugar until combined. Temper in the heavy cream until fully incorporated. Cover with plastic, allow the plastic to touch the custard to help get rid of air bubbles. Chill, but do not freeze (optional). Chilling the custard briefly helps it set and get rid of more air bubbles, you still want the custard to be liquid however so it doesn't need to chill too long.

Fill soufflé molds half of the way up in an ungreased mold.


Bake in a water bath (get a larger pan to put the soufflé molds into, fill

this pan up to half the height of the custards with water). Bake in a 300° F  deck oven (with settings 0-10-10) with the dampers open. Bake at 250°-275°F in a convection oven, cover when baking.
When finished baking, let cool on a cooling rack before freezing.
Take out when you want to serve. Dust the top with sugar. Use blow torch and burn the top of the custards. You should ideally get a thin layer of caramelization on top. Serve within an hour or two so the carmel doesn't soften.

Thursday, February 3, 2011

Charlotte filled with Pastry Cream

This cake has a decorative element to it. Its a nice mousse cake with two layers of different textured creams. It also uses a filled roulade for the "cake" part so the three flavours really play well together. Mousse cakes get their flavour from the base and from the puree's. The shelf life for mousses is about 48 hours in the fridge and 2 weeks (or more) in the freezer.

Formula: yields one 8" cake
2 small raspberry filled roulade, frozen (each roulade is a 1/4 sheet tray size)
Pastry cream mousse: 735 g
   250 g Pastry Cream*
   4 sheets Gelatin
   400 g Cream, whipped
   75 g Fruit concentrate
Italian meringue mousse: double batch**, 600 g
   300 g Italian meringue (make sure to include 1/4t cream of tartar)***
   3 sheets Gelatin
   150 g Cream, whipped
   150 g Fruit concentrate

*Pastry Cream, this formula is scaled down from the formula on pg. 271 of Gisslen, Professional Baking
  154 g Milk
  19 g Sugar
  14.5 g Egg yolk
  19 g Whole egg
  12 g Cornstarch
  19 g Sugar
  9.6 g Butter, room temperature, cubed
  2.5 g Vanilla extract
** A single batch of Italian meringue is too small to mix in an electric mixer. A double batch is enough for two cakes however.
***Italian meringue formula: 200g Sugar, 60g Water, 100g Egg whites, 1/4 t cream of tartar

Tools: 9" cake card, 8" charlotte ring, 9" acetate, serrated knife, offset spatula, thermometer, heat resistant spatula, wooden spoon, whisk


MOP:
Because of how delicate mouses are you want to make sure that you have everything prepped before you start making the mouse.

Grab the two small raspberry filled roulades  from the freezer. Let it sit out a little bit to make it easier to cut. With a serrated knife, slice the roulades to about 1/4" thick sliced jelly rolls.

Place the 8" charlotte ring on top of the 9" cake card. Line the ring with acetate. Keeping the "tail" or seem of the cut roulade facing down, line the ring tightly with the 1/4" pieces. Line the bottom of the cake pan in the same manner. You will have extra cake, and you will have holes between the roulades if you want to you can cut the extra roulades and fill in the holes. This is not necessary though. Set aside.

In mixer or by hand, whip the cream for the pastry cream mouse. Let it set up in refrigeration.

Make the pastry cream. The pastry cream is heavier then the Italian meringue so you want to make sure you use this for the bottom mousse.

Heat milk in sauce pan, add sugar in and whisk on high heat until it boils.
When you see that the milk is getting hot, whisk eggs and egg yolk in a separate bowl . Add sugar and cornstarch to the eggs and whisk until fully combined. Set aside until milk boils.
Bloom gelatin, if you haven't done that already.
When milk boils remove from heat. Temper the milk into the egg mixture (can be done all at once with such a small amount). Combine the two mixtures and then return to saucepan. Return to medium heat to cook. You want to continue to whisk so the eggs dont cook, heat until the mixture makes a "bloop" noise and appearance. You should see the mixture foam up, and then the foam disappear while its heating to the "bloop" state. Remove from heat.

Add butter in small portions. Whisk to combine.
Add bloomed gelatin. Whisk to combine and melt gelatin.
Add pulp, this will cool down the mixture.
Get whip cream from refrigerator. Whisk in the whipped cream to the pastry cream mixture. Make sure to scrape down and fold in sides.
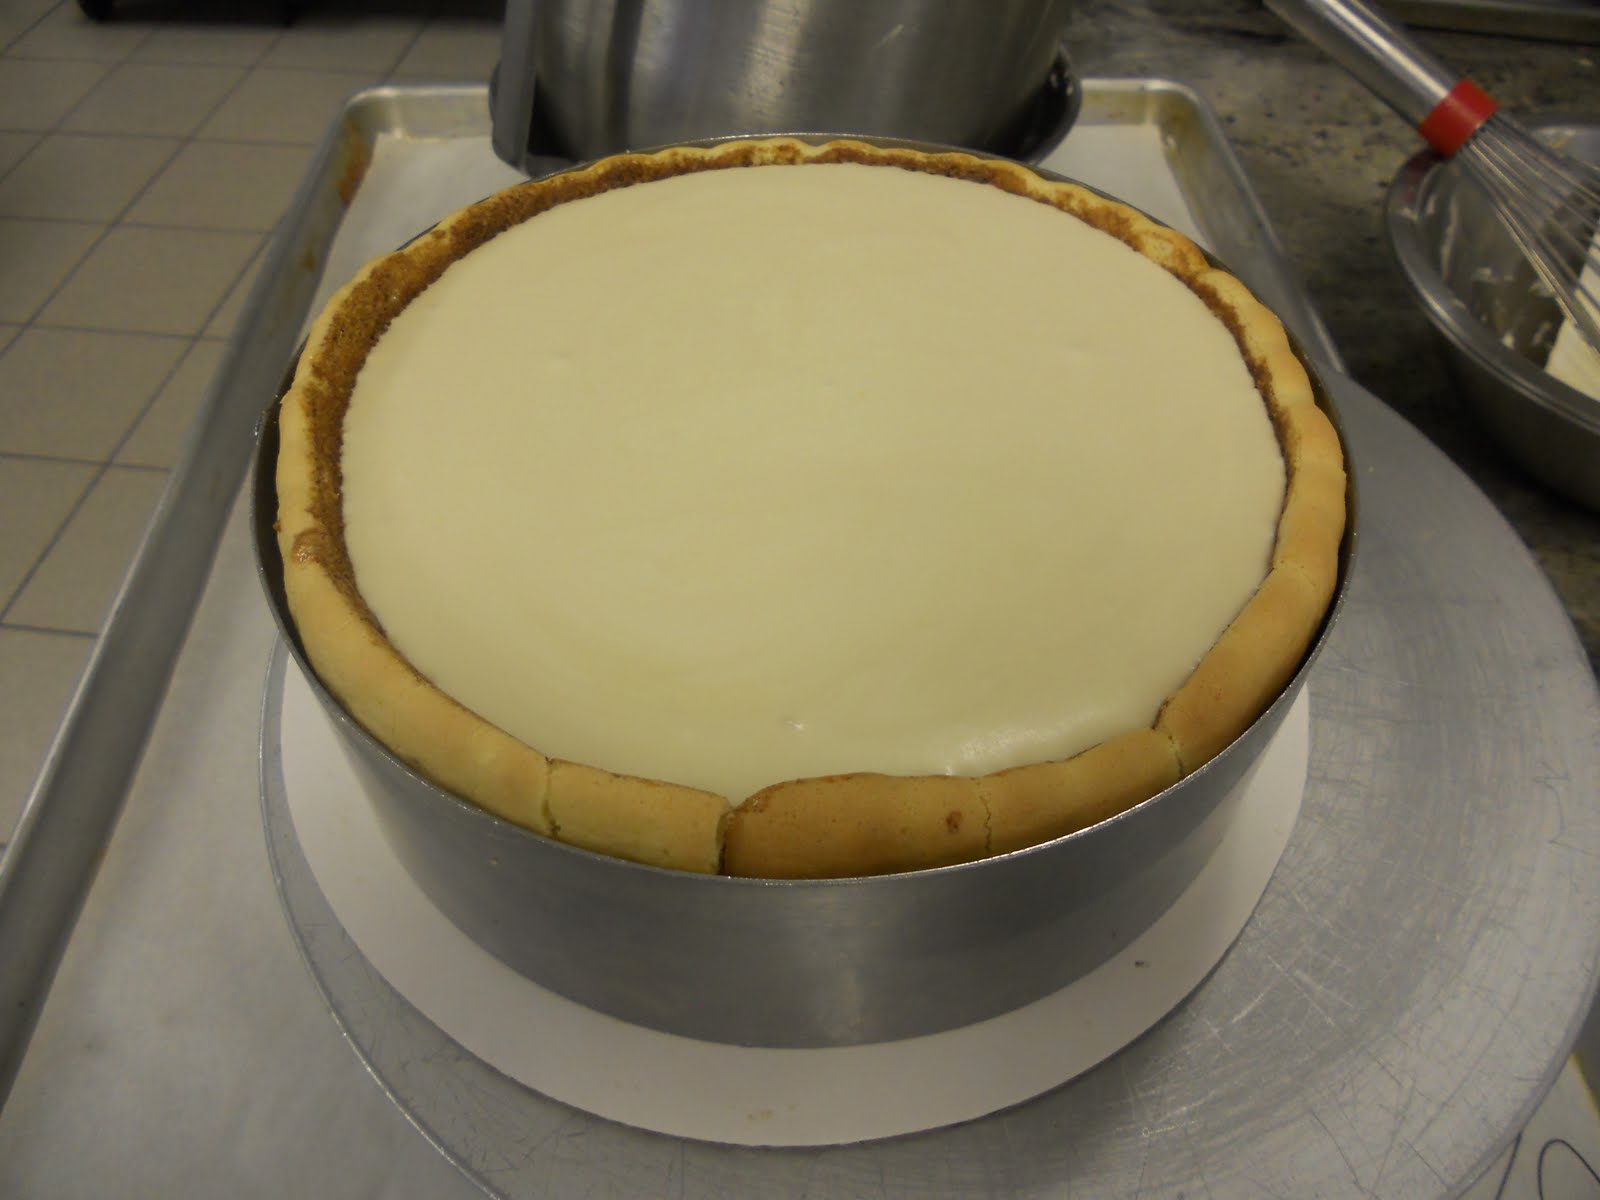
Immediately pour over the prepped cake, until it covers the jelly rolls or half way up the ring. Which ever is closer to half way.
Chill.

In mixer or by hand, whip the cream for the Italian meringue mouse. Let it set up in refrigeration.

Make Italian meringue mouse. Bloom gelatin sheets (or powder).
Make Italian Meringue (see Chocolate Italian Meringue Buttercream for procedure). Set aside in a clean bowl.
In a sauce pan heat up fruit puree, make sure not to boil the liquid. Remove from heat and add gelatin and stir until gelatin is dissolved. Let mixture cool down*, either over ice bath or mix mixing it in electric mixer. When cooled, add puree to whip cream. Fold in meringue. Mix until fully incorporated. Do not over mix.


Take your cake out of the refrigerator or freezer and pour the Italian meringue mousse to the top of the charlotte ring. Use the back of your serrated knife, or offset spatula, to smooth out the top. Chill immediately. Let chill 2-4 hours before serving.

*The ideal temperature for the different ingredients are as follows:
Base (puree), cool 75-85 degrees fahrenheit
Foam, 85-100 degrees fahrenheit
Cream, 30-40 degrees fahrenheit

Roulade

A Roulade is basically a roll thing with a stuffing inside of it. More often it is used to refer to meat dishes. We made two different size roulades out of the same method of preparation.

(Large) Roulade:
This is a large cake sized cake, meaning it'd easily feed 4-8 people, rolled up cake with fruit filling. Frosted with an Italian meringue, and torched.

Fromula: yields two cakes.
1/4 recipe of Swiss roll, baked very thin (about 1/4") on a half sheet pan
1 recipe lemon* custard, room temperature
Italian meringue:
200 g Sugar
60 g Water
100 g Egg Whites

*can use other fruit for custard.


MOP:
Make sure your custard is already prepared and at room temperature or chilled (spreads a little bit thicker and runs less if you chill it before spreading). Make sure your cake is moist and has been chilled or is at least at room temperature.

Cut swiss roll in half, you should have 2 quarter sheet pan sized cakes. Set one aside.
Lay swiss roll on parchment paper, parchment should be larger then the swiss roll. Have one end of the swiss roll be about 2" from the edge of the parchment, this is the side you are going to roll from. Pour lemon curd onto swiss roll from the center. Use your offset spatula to spread the curd out evenly to 1" from the edge on the cake. From starting side, roll about 1/2" of the cake over itself. Press down to seal in the curd, roll another bit over this. Make sure to keep the rolls tight, you will loose some of the curd and you roll, try to keep it in best you can. Continue in this sushi roll method all the way to the end. Fold the parchment over the whole roll, covering everything. Wrap in
plastic with your seal down. This is exactly like rolling a sushi. Repeat with the other half of the swiss roll.
Freeze both of the cakes to let them sit up. Make Italian Meringue.

Take both cakes out of the freezer and apply a thick layer of the meringue on the cake. Covering, with a texture. Torch the meringue to give it a golden to dark brown colour. Be careful, do not over torch or blacken or burn the cake.


If you are using a roulade for garnishing on another cake (like for the Charlotte cake) use only half the amount that you would use for this recipe. They are going to be rolled half the size of the cakes shown above.

Wednesday, January 26, 2011

Tiramisu

This is not what I'd think of the traditional way of preparing a Tiramisu cake but it comes out quite lovely in both composition and sliced into pieces.


Formula*: yields one 7" cake
Lady fingers, one 7" bottom and side pieces
Pate Glace (melting chocolate)
Mascarpone filling (See fillings, Mascarpone)
3-6 oz. Simple syrup (depends on how dry your cake is)
1.5 Tbl Trablit (concentrated coffee)**

Tools: Small off set spatula, bowl scraper, 7" charlotte ring, 8" cake card, parchment paper or ascetate

*Adapted from Gisslen, Professional Baking, Ed. 5, Pg. 474
**If you can find Trablit you can use very strong espresso, one shot should be good. Or you can pour concentrated drip coffee with simple syrup.

MOP: assemble
Heat up Pate Glace if necessary. Pate Glace is basically a thin glazing chocolate. If you dont have Pate Glace on hand then you can heat up cocoa butter and oil and make a thin glazing or melting chocolate.

Take your lady fingers and gently de pan from the parchment paper. The circle shape and the individual fingers you should be able to get up with a off set spatula. The larger strips you should cut the parchment a little bit wider then the fingers, cut another piece of parchment to place on top. Sandwiched between the two parchments, flip over the row of lady fingers gently. Peel the "old" sheet off of the back of the lady fingers.
Make sure your circle shape lady fingers are a little bit smaller then the charlotte ring that you are using, just smaller then 7". If its not then trim the lady fingers. Coat the bottom of the ring with Pate Glace. Put this in the freezer briefly to cool the chocolate.
While this is setting up you can trim your other lady fingers if need be. You want the strip to be moist so you can bend it, if its not moist dab the inside (not textured side) with simple syrup. If the fingers sit higher then your charlotte ring then trim them down on one side only (the trimmed side will be your bottom).

Pull the bottom out of the freezer, place this chocolate side down on the cake card. The chocolate is going to be a stabilizer for your cake shape when you pull the finished cake out from a freezer.
Place the lady finger strip along the side of the charlotte ring baked side in, so you can see the definition of each lady finger on the outside of the cake. Make sure to leave the parchment on the outside of the ladyfingers between the fingers and the ring, this will make it easier to keep the cake moist when freezing and make it easier to keep its shape when defrosting. Dab the inside of the sides and bottom of the cake with simple syrup and coffee mixture.
Fill immediately will Mascarpone filling (see fillings). Use your tiny offset spatula to flatten out the top if necessary. Chill the cake as soon as you fill the cake.

When you take the cake out of the freezer, dust the top with cocoa powder. Using a stencil gives it a nice elegant look. Cut and serve!

If you have extra filling, and extra cake (although you don't need cake to do this). Get a few soufle cups and fill it with the mascarpone filling. You can either use the left over simple syrup with a little bit of coffee to make "latte art" attempts like I did, or you can also chill these and then dust with cocoa powder.

Sunday, January 23, 2011

Dobos Torte

This traditionally is a Hungarian seven-layer cake, we made it a six layer cake in class, that is generally made in a rectangle or strip shape. The cake is covered with chocolate butter cream and then topped with caramelized cake wedges, and traditionally had toasted almond halves around the sides of the cake. The cake is usually made with Dobos cake layers, which is just a hazelnut cake. The cake pictured below is made with a swiss roll.

Dobos Torte*: yields 1, 8" cake
Ingredients:
1 sheet, Swiss roll cake (or 4, 8" cakes of sponge consistency)
1 lb 11 oz. Italian Chocolate Meringue Butter Cream**
7.5 oz Sugar, cooked to a light caramel stage with 1.5 oz water
Pralines, or other kind of toasted nuts for garnish

Tools: Stainless steel bowls, burner, mixer, offset spatula, serrated knife, chefs knife, piping bag, small star (or circle) tip, bowl scraper, spatula or wooden spoon, brush , 8" cake card, 9" cake card, 8" cutting template, cutting board

*This formula is modified from Gisslen, Professional Baking, Ed. 5, Pg. 460
**When we made this cake in class we needed about 6 oz of extra buttercream


MOP: assemble a six layer Dobos Torte
(If you are making a traditional seven layer torte, add one layer to the stack)
If frozen, take the swill roll cake out of the freezer before you use it so it is easier to cut. Remember you don't have to freeze or chill cakes before assembling them, the more frozen the cake is the easier it should be to cut and you will get less crumbs when cutting it. Cut the cake into seven 8" circles that are roughly 1/2" thick.
In class we baked roughly a 1" thick sheet tray so we used a 8" template to cut 6 cakes out of the sheet. We then cut each 8" circle in half. If you want to make it easier for you you can just bake a 1/2" thick sheet tray (half of the swiss roll recipe). Whatever works best for you.

Take one layer, the thinnest one, and set it aside to use for the garnish.

The remaining six layers are for assembling the cake. Take one bottom piece and place it cut side up on the 8" cake card. Dab with simple syrup to moist the cake. Apply a thin layer of buttercream on the cake layer, roughly 2 oz. Place another layer of cake on top of the buttercream, try to get it as even as possible with the previous layer. Dab with simple syrup, apply thin layer of buttercream. Repeat this until all six layers are used. If you start to see that its getting uneven at the top compensate with your layers, because chances are some of them will be a little uneven.

Dab the top with simple syrup and then frost the top of the cake with buttercream. Straighten the buttercream at the top out before frosting sides. You don't have to frost the sides heavily or too smoothly because you will cover it with nuts. Clean up or smooth out the sides and top to look flat. Line the side of the cake with Pralines. Using the back of your knife score the top of the cake in 10 pieces. See image for visual aide in cutting.

The first score you want to do right down the middle.
The second score you want to do at a "bow tie" distance from the first cut.
The third cut you want to halve the larger section.
The fourth cut you want to halve the larger section.
The fifth cut you want to halve the larger section.

Use your small star tip or circle tip and make small dime size rosettes around the edge of the cake. You don't have to have the same number of rosettes in each slice, just make sure the rosettes are contained in the area marked out for slices. Then, using the same star tip but with more pressure applied, pip a large rosette in the center of each slice. Set the cake aside in the refrigerator to help the buttercream harden slightly.

Heat 7 1/2 oz. sugar with 1.5 oz water in a saucepan. Heat this until it reaches a light golden caramelized colour. While the caramel is heating up lightly oil a cutting board and a chefs knife, place the layer of cake that you set aside for garnish on the cutting board.
A note about caramel. This method of making caramel is a wet caramel, which means you slowly cook the sugar in the water. When you are making such a small amount of caramel, like this batch, the caramel doesn't take too long to make in the wet method. If you are making large batches or are in a hurry you can make a dry caramel which is where you alternate portions of sugar and water until you get a smooth caramel consistency. With this method you have to keep stirring it the entire time to avoid burning.

When the caramel is set up pour over the cake. Use a off set spatula or a brush to help you get the caramel to coat the cake entirely and evenly/smoothly. The faster you work and the less you work it the prettier your garnish will look. Don't let the caramel sit too long, but when it feels firm score the caramel coated cake into 10 pieces and then cut it into 10 pieces. If you wait too long the caramel will harden and crack when you cut into it.


Take the cake out and arrange each piece of caramel coated cake on top of each slice on a slant, resting on the large rosette in the center of the cake.


Wednesday, January 19, 2011

Strawberry Genoise Cake

If cakes are measured by how long the name is and how delicious the cake is, then this one would deffinately fit the rule. I didnt want to just say strawberry cake because that brings up images of sheet cakes at Jewel into my mind. This cake is not the cake you would get at Jewel. We did a costing excersize on this cake and it turns out to be aproximately $3.24 per slice if you want to sell it and break even on product cost. That means that the cake would have to be roughly $32.00 to make you any sort of profit. I'll let you know on Thursday if its worth $32.00 taste wise.

Bravarian cream is a very time sensative cream. This makes the steps to this cake very important, its crucial that you have the cake set up before you make the cream. If you dont do this then the cream will start to get lumpy from sitting out and it will not fill smoothly at all when added to the cake.

Formula Yields: One 8" Strawberry Genoise Cake with Vanilla Bravarian Cream*

Ingredients**:
0.75 oz. Sheet gelatin
approximately 5oz. Cold water
1 pt Heavy Cream
Simple Syrup
(The following ingredients make Creme anglaise: Bravarian Cream)
4 oz. Egg yolks
4 oz. Sugar
1 pt. Milk
0.25 oz. Vanilla

Tools:
Offset palette knife, serrated knife, pairing knife, rubber spatula or bowl scrapper, pastry brush, turntable, 7" template, 9" cake card, 8" mouse mold (ring), approximately 10" acetate (enough to line 8" mold), large bowl of ice, smaller stainless steel bowl to fit inside large ice bath, sauce pan, thermometer

*This formula is from Gisslen, pg. 463
**This formula is from Gisslen, pg. 534


MOP: assemble
First thing you want to do is take your frozen genoise cake out of the freezer, maybe an hour if you have that luxury, before you are going to use it. Remember that frozen cakes are harder to cut then chilled cakes. So what I'd do is take your cake out, scale your ingredients for the creme, wash your strawberries, get your cake boards and molds. 

Take your genoise cake and cut it into 3 equal layers.
Take two of the layers (the third one you are not going to use, but can be used for cake crumbs or to put in a brownie batter, or you can use it to make smaller individual desserts if you have left over bravarian cream...). Using a 7" cake pan or template trim the two layers you are going to use down to 7" circles.

Place the 8" ring on top of the 9" cake card, line the ring with acetate. Then put one of the cake layers in the middle of the 8" ring. Take your washed strawberries and cut off the tops, make sure to cut down to remove any white flesh as well. Slice the strawberries in half length wise. There should be a gap between your cake and the mold, place the strawberries in this gap with the cut side of the strawberry touching the acetate, and the bottom of the strawberries touching the cake card. Line the cake all the way around with strawberries. Dab the top of the cake with simple syrup and set aside for now.


Next you want to make your whip cream.
Take the 1 pt. (16 oz.) of heavy cream and whisk with with a wire whisk attachment in your mixer. Whisk to a soft peak, soft peak should look like the consistency of a milkshake, you'll be able to start seeing a whisk trail in the cream. Turn off mixer and place the cream in the refrigerator to set up, doesn't need to be covered.

Now that everything else is set up you can start to make the Creme anglaise. This is a creme that is used in a lot of different desserts. It is essentially a vanilla custard and is sometimes referred to as just custard or vanilla sauce.

Make sure you have a stainless steel bowl set up with an ice bath (ice and water). If you are using sheet gelatin place in a bowl with 5 oz of cold water (enough to cover it), start soaking to soften the gelatin. Heat 16 oz. of milk in a sauce pan, heat till it boils. While its heating you can start gently whisking your egg yolks and sugar in the smaller stainless steel bowl that you got out. Whisk this continuously but slowly other wise you run the risk of scrambling your eggs. When the milk boils remove it from the heat and half of the milk to the egg/sugar mixture. Whisk. When its incorporated add this mixture back into the saucepan, get a wooden spoon and bring the saucepan back to the heat. Mix with your wooden spoon, making sure to scrape the corners and bottom so the egg doesn't scramble while its heating up. Heat this until it reaches 180 degrees, no higher other wise the egg will start to cook.

Squeeze out the water from the gelatin while this is cooking. Place this into your smaller stainless steel bowl. Remove the saucepan from heat immediately when the creme reaches 180 degrees and pour over gelatin, mixing to melt the gelatin. Gelatin melts at around 100 degrees so it should melt immediately. Put this stainless steel bowl over an ice bath immediately to stop carry over cooking. You want to cool the creme/gelatin down to 55-60 degrees before you add the whip cream.

You also don't want to leave the creme/gelatin for more then one minute though otherwise it will start to harden and get lumpy. Continue mixing until it reaches 55-60 degrees fahrenheit. Take your whip cream out of the refrigerator, grab a clean whisk so you don't run the risk of cross contamination from raw eggs. Temper the whip cream into the creme/gelatin mixture in three portions to avoid temperature shock, each time you pour the whip cream in whisking to incorporate. When its all mixed together use your spatula to clean off the sides. Immediately pour the finished creme anglaise into the cake mold so its just covers the tops of the
strawberries. You can smooth it out to the edges using your spatula if you want. Place the second layer of cake on top of the creme anglaise. Push down gently to get out any air bubbles. Dab this layer of cake with simple syrup and then pour the rest of the cream on top, to the top of the mold. Use your offset spatula (or the straight side of your serrated knife), going back and forth over the top of the mold to flatten out the creme and to smooth out the top at the same time. Be careful you don't do this too many times because you will start to curdle the creme making it lumpy.

Freeze the cake for a minimum of 3-4 hours to set the mouse (creme anglaise)

A note about this cake. If you are going to freeze a creme cake you would not want to idealy use fresh fruit in this manner. When you take the cake out of the freezer the fruit is immediately going to start sweating. If you want to incorporate fruit in this kind of cake you could mix the fruit in with the bravarian cream. If you wanted to still have the decorative fruit shapes along the outside you could use candied fruit, or dried fruit. Or just serve to eat in one sitting.