Showing posts with label Filling. Show all posts
Showing posts with label Filling. Show all posts
Monday, May 9, 2011
Monday, March 7, 2011
Butterless Cream, in bulk
Butterless Cream
25# Powdered sugar
4 qt Water, hot*
25# Sweetex (high ratio shortening)
*use very hot water as the heat helps to break down the powdered sugar
MOP:
Put sugar and water into mixer, pluse to start incorporating the sugar. When you dont think the mixture will spray everywhere increase speed to 1st and then 2nd speed. The mixture should be very wet. Stop the mixer to scrape down the bowl as neededd.
Add high ratio shortening. Continue mixing until the shortening starts to break down and a liquid consistency is reached. Scrape down the bowl. Mix for an additional 10 minutes in second speed.
This cream can be mixed with old cream and will not spoil because of the shortening. If you want the cream to taste a little better you can substitute part of the sweetex for butter, just be aware that it will start to spoil and warm faster.
Saturday, February 19, 2011
Raspberry Mousse
This mousse is a simple curd + cream method. You can use any kind of fruit purée for this formula, just remember that if you are using a fruit that is very sweet (blood oranges, coconut, mango, blackberry) that you want to substitute 50% lemon juice for the purée. For acidic fruits like passion-fruit, you do not need to add any more acid into the purée.
Formula: yields 34.88 oz. (enough to fill one 8" cake)
3.75 oz. Raspberry purée
6.25 oz. Sugar
7.5 oz. Egg yolk
3.5 oz. Butter
13.75 oz. Heavy cream
 0.13 oz. Gelatin (1 sheet)
Tools: stainless steel bowl, whisk, heat resistant spatula, saucepan, mixer
MOP:
 In a saucepan heat purée and half of the sugar (aprox. 6.1oz) until the mixture boils. Stir so that the sugar and purée are combined, you do not need to stir it any more then this.
While the purée is heating up whisk your egg yolk and the rest of the sugar in a stainless steel bowl, stir to incorporate.
When the purée has boiled, temper half of the purée into the egg yolks, mix to combine and then return the mixture to the saucepan.
Stir, on low heat or off heat, until the mixture sets up to a thick custard state. When the mixture is thick, remove from heat and add butter slowly or in pieces into the mixture. Essentially you have just made a fruit curd.
Let the mixture cool, you can leave it covered with plastic touching the surface of the curd at room temperature.
Bloom your gelatin in cold water.

Whip heavy cream to a soft peak or a milkshake consistency.
Make sure you have your mold ready before you continue to the next step.
When the curd has cooled to room temperature fold the cream into the curd. Heat up your gelatin (without the water). You can dot this by microwaving the gelatin for a few seconds to melt it. Add the melted gelatin to the cold curd+cream mixture. Whisk to combine. Pour into mold. Chill to set before serving.
Gelée
Gelée is French for jelly. This is a simple fruit jelly that can be used as an addition to a cake or a garnish to a desert.
Formula: yields one 7" circle
6 5/8 oz. Purée
2 oz. Sugar
1/4 oz. Gelatin
MOP: Bloom gelatin in cold water. Over a saucepan heat purée and sugar until hot, stir in gelatin (without water). Stir until the sugar and gelatin are fully dissolved. Pour mixture into mold. Freeze to set.
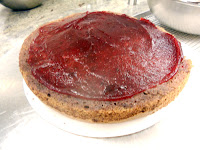
For the Raspberry Passion-Fruit Mousse Cake in this portfolio we poured the gelée into a 7" genoise pan that is lined with plastic wrap.
 |
| This is what the frozen, set gelée looks like |
6 5/8 oz. Purée
2 oz. Sugar
1/4 oz. Gelatin
MOP: Bloom gelatin in cold water. Over a saucepan heat purée and sugar until hot, stir in gelatin (without water). Stir until the sugar and gelatin are fully dissolved. Pour mixture into mold. Freeze to set.
For the Raspberry Passion-Fruit Mousse Cake in this portfolio we poured the gelée into a 7" genoise pan that is lined with plastic wrap.
Friday, February 18, 2011
Banana Mousse
This is a pretty sweet and healthful mousse, if you want to consider a mousse to be healthful. The important thing to remember when using a fruit like banana in a mousse is that you want to food process the banana's even if they are over ripe. You want the texture of the fruit to be the most puree like possible for a uniform creamy texture. A mousse is a very similar technique to the technique used for a curd (lemon-curd-fruit-curd).
Formula*: yields 1# 15 oz pulp (enough to fill one 8" cake)
8g Gelatin
310g Banana pulp, fresh or frozen
25g Lemon juice
35g Sugar
420g Heavy cream
*This formula is adapted from Gisslen, Professional Baking, Ed. 5, pg. 543
MOP:
Add lemon juice to banana pulp to preserve colour of bananas. If you do not do this your mousse will form a unappealing brownish colour.
Whip heavy cream to a soft peak, milkshake consistency. Refrigerate to help set up.
Bloom, or soften, gelatin in cold water. Set aside until you are ready to use.
Heat one-third of the banana pulp to 140°F in a sauce pan**. When the pulp reaches temperature turn off heat and add gelatin to pulp, before use squeeze water out of sheet gelatin. Stir in gelatin until it fully dissolves. Add sugar and stir in until it dissolves.
Add the heated mixture to the remaining cooled banana pulp. You can use a white rum in this recipe as well (25g), if you have this addition you would add it now as well. Continue to stir the mixture to cool to 75°F, you can also cool it by stirring it over an ice bath. This mixture will not thicken that much.
Fold whipped cream into banana mixture. Fully incorporate and fill molds. Chill to set.
**Banana's are acidic and when you heat them up they loose some of their taste due to the acid. You can omit this stage and do a cold infusion for this recipe if you desire. If you omit this step you will still need to heat up the gelatin before adding it to the mousse.
Thursday, February 3, 2011
Charlotte filled with Pastry Cream
This cake has a decorative element to it. Its a nice mousse cake with two layers of different textured creams. It also uses a filled roulade for the "cake" part so the three flavours really play well together. Mousse cakes get their flavour from the base and from the puree's. The shelf life for mousses is about 48 hours in the fridge and 2 weeks (or more) in the freezer.
Formula: yields one 8" cake
2 small raspberry filled roulade, frozen (each roulade is a 1/4 sheet tray size)
Pastry cream mousse: 735 g
250 g Pastry Cream*
4 sheets Gelatin
400 g Cream, whipped
 75 g Fruit concentrate
Italian meringue mousse: double batch**, 600 g
300 g Italian meringue (make sure to include 1/4t cream of tartar)***
3 sheets Gelatin
150 g Cream, whipped
150 g Fruit concentrate
*Pastry Cream, this formula is scaled down from the formula on pg. 271 of Gisslen, Professional Baking
154 g Milk
19 g Sugar
14.5 g Egg yolk
19 g Whole egg
12 g Cornstarch
19 g Sugar
9.6 g Butter, room temperature, cubed
2.5 g Vanilla extract
** A single batch of Italian meringue is too small to mix in an electric mixer. A double batch is enough for two cakes however.
***Italian meringue formula: 200g Sugar, 60g Water, 100g Egg whites, 1/4 t cream of tartar
Tools: 9" cake card, 8" charlotte ring, 9" acetate, serrated knife, offset spatula, thermometer, heat resistant spatula, wooden spoon, whisk

MOP:
Because of how delicate mouses are you want to make sure that you have everything prepped before you start making the mouse.
Grab the two small raspberry filled roulades from the freezer. Let it sit out a little bit to make it easier to cut. With a serrated knife, slice the roulades to about 1/4" thick sliced jelly rolls.

Place the 8" charlotte ring on top of the 9" cake card. Line the ring with acetate. Keeping the "tail" or seem of the cut roulade facing down, line the ring tightly with the 1/4" pieces. Line the bottom of the cake pan in the same manner. You will have extra cake, and you will have holes between the roulades if you want to you can cut the extra roulades and fill in the holes. This is not necessary though. Set aside.
In mixer or by hand, whip the cream for the pastry cream mouse. Let it set up in refrigeration.
Make the pastry cream. The pastry cream is heavier then the Italian meringue so you want to make sure you use this for the bottom mousse.
Heat milk in sauce pan, add sugar in and whisk on high heat until it boils.
When you see that the milk is getting hot, whisk eggs and egg yolk in a separate bowl . Add sugar and cornstarch to the eggs and whisk until fully combined. Set aside until milk boils.
Bloom gelatin, if you haven't done that already.
When milk boils remove from heat. Temper the milk into the egg mixture (can be done all at once with such a small amount). Combine the two mixtures and then return to saucepan. Return to medium heat to cook. You want to continue to whisk so the eggs dont cook, heat until the mixture makes a "bloop" noise and appearance. You should see the mixture foam up, and then the foam disappear while its heating to the "bloop" state. Remove from heat.

Add butter in small portions. Whisk to combine.
Add bloomed gelatin. Whisk to combine and melt gelatin.
Add pulp, this will cool down the mixture.
Get whip cream from refrigerator. Whisk in the whipped cream to the pastry cream mixture. Make sure to scrape down and fold in sides.
Immediately pour over the prepped cake, until it covers the jelly rolls or half way up the ring. Which ever is closer to half way.
Chill.
Make Italian meringue mouse. Bloom gelatin sheets (or powder).
Make Italian Meringue (see Chocolate Italian Meringue Buttercream for procedure). Set aside in a clean bowl.
In a sauce pan heat up fruit puree, make sure not to boil the liquid. Remove from heat and add gelatin and stir until gelatin is dissolved. Let mixture cool down*, either over ice bath or mix mixing it in electric mixer. When cooled, add puree to whip cream. Fold in meringue. Mix until fully incorporated. Do not over mix.

Take your cake out of the refrigerator or freezer and pour the Italian meringue mousse to the top of the charlotte ring. Use the back of your serrated knife, or offset spatula, to smooth out the top. Chill immediately. Let chill 2-4 hours before serving.
*The ideal temperature for the different ingredients are as follows:
Base (puree), cool 75-85 degrees fahrenheit
Foam, 85-100 degrees fahrenheit
Cream, 30-40 degrees fahrenheit
Formula: yields one 8" cake
2 small raspberry filled roulade, frozen (each roulade is a 1/4 sheet tray size)
Pastry cream mousse: 735 g
250 g Pastry Cream*
4 sheets Gelatin
400 g Cream, whipped
 75 g Fruit concentrate
Italian meringue mousse: double batch**, 600 g
300 g Italian meringue (make sure to include 1/4t cream of tartar)***
3 sheets Gelatin
150 g Cream, whipped
150 g Fruit concentrate
*Pastry Cream, this formula is scaled down from the formula on pg. 271 of Gisslen, Professional Baking
154 g Milk
19 g Sugar
14.5 g Egg yolk
19 g Whole egg
12 g Cornstarch
19 g Sugar
9.6 g Butter, room temperature, cubed
2.5 g Vanilla extract
** A single batch of Italian meringue is too small to mix in an electric mixer. A double batch is enough for two cakes however.
***Italian meringue formula: 200g Sugar, 60g Water, 100g Egg whites, 1/4 t cream of tartar
Tools: 9" cake card, 8" charlotte ring, 9" acetate, serrated knife, offset spatula, thermometer, heat resistant spatula, wooden spoon, whisk

MOP:
Because of how delicate mouses are you want to make sure that you have everything prepped before you start making the mouse.
Grab the two small raspberry filled roulades from the freezer. Let it sit out a little bit to make it easier to cut. With a serrated knife, slice the roulades to about 1/4" thick sliced jelly rolls.

Place the 8" charlotte ring on top of the 9" cake card. Line the ring with acetate. Keeping the "tail" or seem of the cut roulade facing down, line the ring tightly with the 1/4" pieces. Line the bottom of the cake pan in the same manner. You will have extra cake, and you will have holes between the roulades if you want to you can cut the extra roulades and fill in the holes. This is not necessary though. Set aside.
In mixer or by hand, whip the cream for the pastry cream mouse. Let it set up in refrigeration.
Make the pastry cream. The pastry cream is heavier then the Italian meringue so you want to make sure you use this for the bottom mousse.
Heat milk in sauce pan, add sugar in and whisk on high heat until it boils.
When you see that the milk is getting hot, whisk eggs and egg yolk in a separate bowl . Add sugar and cornstarch to the eggs and whisk until fully combined. Set aside until milk boils.
Bloom gelatin, if you haven't done that already.
When milk boils remove from heat. Temper the milk into the egg mixture (can be done all at once with such a small amount). Combine the two mixtures and then return to saucepan. Return to medium heat to cook. You want to continue to whisk so the eggs dont cook, heat until the mixture makes a "bloop" noise and appearance. You should see the mixture foam up, and then the foam disappear while its heating to the "bloop" state. Remove from heat.

Add butter in small portions. Whisk to combine.
Add bloomed gelatin. Whisk to combine and melt gelatin.
Add pulp, this will cool down the mixture.
Get whip cream from refrigerator. Whisk in the whipped cream to the pastry cream mixture. Make sure to scrape down and fold in sides.
Immediately pour over the prepped cake, until it covers the jelly rolls or half way up the ring. Which ever is closer to half way.
Chill.
In mixer or by hand, whip the cream for the Italian meringue mouse. Let it set up in refrigeration.
Make Italian meringue mouse. Bloom gelatin sheets (or powder).
Make Italian Meringue (see Chocolate Italian Meringue Buttercream for procedure). Set aside in a clean bowl.
In a sauce pan heat up fruit puree, make sure not to boil the liquid. Remove from heat and add gelatin and stir until gelatin is dissolved. Let mixture cool down*, either over ice bath or mix mixing it in electric mixer. When cooled, add puree to whip cream. Fold in meringue. Mix until fully incorporated. Do not over mix.

Take your cake out of the refrigerator or freezer and pour the Italian meringue mousse to the top of the charlotte ring. Use the back of your serrated knife, or offset spatula, to smooth out the top. Chill immediately. Let chill 2-4 hours before serving.
*The ideal temperature for the different ingredients are as follows:
Base (puree), cool 75-85 degrees fahrenheit
Foam, 85-100 degrees fahrenheit
Cream, 30-40 degrees fahrenheit
Wednesday, February 2, 2011
Lemon Curd (fruit curd)
Lemon curd is pretty much a fruit mousse filling for a pastry cake. Curds are very thin mousse so they work very well as a filling for a lot of different cakes, not just swiss rolls (which is how we are using this fruit curd filling).

Formula:
4 oz. Lemon Juice*
6.5 oz. Sugar
2 t. Zest (lemon)
2 Eggs
6 oz. Butter
*If you use lemon juice dont be lazy, grab real lemons and squeeze the juice out of them. To help you get the juice out faster roll the whole lemon on the table gently several times to soften it up before you cut into it and start squeezing. You can also substitute other fruits for lemon. Depending on the acidity of the fruit you pick you will still want to have a portion of lemon juice. Below are some examples of acidity and of the proportions.
100% passionfruit (acidic fruit) use 4 oz. for this recipe
75% raspberry, 25% lemon juice
50% Blackberry/coconut/mango (dull fruits), 50% lemon juice
MOP: For my curd I used 50% lychee and 50% lemon juice.
Combine puree and lemon juice over heat in a saucepan. Heat over medium heat until boils.
Add half of the sugar and whisk/stir it in briefly.
In separate bowl, whisk 2 eggs and the rest of the sugar. You divide the sugar so that the sugar does not dry out the eggs or so it doesn't risk increasing the boiling point of the liquid by too much.
When the liquid comes to a boil remove from heat and temper liquid mixture to sugar/egg mixture. Stir to incorporate. Bring back to heat to thicken to a custard state. Continue to stir so you dont cook the eggs, remove from heat if you see it start to cook. Do not boil.

Turn off heat. Add butter in small pieces (about 2T at a time) to the custard. This should be a slow process so the oils from the butter do not separate the custard.
When you have added about half of the butter into the custard you can add the zest. This is really a personal choice for when you add the zest. Remember the longer you have it in the stronger the flavour will be.
When all the butter is mixed in set aside to let cool. Cover with plastic, plastic needs to be touching the custard when cooling otherwise a film will form on the surface.
Wednesday, January 26, 2011
Mascarpone Filling
This is a filling that is traditionally used for Tiramisu. Mascarpone is a soft cheese that will separate the more you whip it. So when using for baking make sure you pull it out of refrigeration a few hours before you are going to use it so that it is easier to whip, and so when whipping you can handle it less.
Formula*:
1 lb 8 oz. Heavy cream
0.3 oz. Gelatin (can use 1 piece of sheet gelatin)
2 Egg yolks
6 oz. Sugar
4 oz. Water
2 oz. Corn syrup
Tools: mixer with whisk attachment, saucepan, stainless steel bowl, bowl scrapper
*This formula is from Gisslen, Professional Baking, Ed. 5, Pg. 474
MOP: Pate a bombe or sabayon method or cooked sugar method
In mixing bowl whisk up cream to a soft peak, should look like a milkshake consistency. When whipped up, set aside in the refrigerator to set up.
 Bloom gelatin with cold water. If you use sheet gelatin add water, if you are using powdered gelatin you need to bloom with 5 times the amount of water (eg. 0.3 oz. gelatin with 1.5 oz. water). Stir the powdered gelatin to incorporate and to allow it to fully soak up. Powdered gelatin has a thicker colour and also a thicker animal flavour. Set aside. Add cornstarch, sugar, and egg yolk in stainless steel bowl. Stir with whisk, if you need to add water to thin it out do so until it reaches a simple syrup consistency. Whisk over a hot water bath until it reaches 180 degrees, point of pasteurization. It should look like a light yellow colour and have a ribbon consistency. You can add gelatin when a ribbon consistency is formed, continue stirring to incorporate and until the
 heat reaches 180 degrees.
Transfer heated mixture to mixer bowl. Start mixing on high to help it achieve a thicker ribbon consistency and to cool down the mixture. Like fresh taffy. Continue mixture so its warm to touch but not hot so that the gelatin isn't hard but that the heat doesn't melt the cheese.
Clean stainless steel bowl. Add mascarphone cheese and break down, flatten out, with your bowl scrapper. Add the sugar mixture into the bowl. Use spatula, bowl scraper, or whisk if needed to smoothen the mixture out and combine mixtures. Get out all of the lumps. Take cream out of refrigerator and fold the heavy cream into the batter, either temper it in portions or all at once. Do not over mix!
Immediately pour into prepared pan.
If you are mixing with your hands be careful to use clean hands, this filling is not being baked!
Formula*:
1 lb 8 oz. Heavy cream
0.3 oz. Gelatin (can use 1 piece of sheet gelatin)
2 Egg yolks
6 oz. Sugar
4 oz. Water
2 oz. Corn syrup
Tools: mixer with whisk attachment, saucepan, stainless steel bowl, bowl scrapper
*This formula is from Gisslen, Professional Baking, Ed. 5, Pg. 474
MOP: Pate a bombe or sabayon method or cooked sugar method
In mixing bowl whisk up cream to a soft peak, should look like a milkshake consistency. When whipped up, set aside in the refrigerator to set up.


Transfer heated mixture to mixer bowl. Start mixing on high to help it achieve a thicker ribbon consistency and to cool down the mixture. Like fresh taffy. Continue mixture so its warm to touch but not hot so that the gelatin isn't hard but that the heat doesn't melt the cheese.
Clean stainless steel bowl. Add mascarphone cheese and break down, flatten out, with your bowl scrapper. Add the sugar mixture into the bowl. Use spatula, bowl scraper, or whisk if needed to smoothen the mixture out and combine mixtures. Get out all of the lumps. Take cream out of refrigerator and fold the heavy cream into the batter, either temper it in portions or all at once. Do not over mix!
Immediately pour into prepared pan.
If you are mixing with your hands be careful to use clean hands, this filling is not being baked!
Saturday, January 22, 2011
Italian Chocolate Meringue Butter Cream
This is a very stable filling, considered a stiff or hard filling. It is made with a cooked sugar method where it is heated to 240-245 degrees.
Formula*:
Italian meringue
8 oz. (100%) Sugar
2 oz. (25%) Water
4 oz. (50%) Egg whites
12 oz. (150%) Butter, soft and cubed (large marshmallow size)
2 oz. (25%) Emulsified shortening (or additional butter)
0.08 oz. (1/2t) (1%) Lemon juice**
0.12 oz. (3/4t) (1.5%) Vanilla extract
Chocolate paste****.

*This formula is modified from Gisslen, Professional Baking, Ed. 5, Pg. 426
** Can substitute with lime juice or cream of tartar
***This yields enough for 40ish cakes, it is a 2:1 ratio. Adjust according to what you think you will use.
MOP: Italian chocolate meringue butter cream
 In sauce pan combine sugar and water, mix until incorporated. Turn heat on high and stir over heat until it reaches 240 degrees Fahrenheit. You can either test for doneness with your thermometer or by making a soft ball with your fingers, make sure your hands are clean!
To do this place your hands in ice water until its cold and then dip your fingers in the sugar and immediately dip your fingers back in the ice water. Press your fingers together to make a ball out of the sugar. If a soft ball forms in your fingers it is at 240 degrees.
While that is heating up add your egg whites and lemon juice together into your mixers bowl. Do not combine these two while scaling if you are going to leave out for a while, the acid in the lemon will start to cook the egg whites. When your sugar mixture starts to boil start mixing your egg whites with a whisk attachment. Start on low speed and increase to high until egg whites are foamy.
When egg whites are foamy decrease speed. When sugar is done remove from heat. Drizzle sugar into the egg whites on a low speed. When the sugar stops dripping increase the speed of the mixer to high. Feel the bottom of the mixing bowl, when the heat has cooled down (like a baby's bottle temperature) start to add the softened butter in portion by portion. Continue mixing until it stiffens up, should look like frosting... thick and choppy. Turn off speed and add the cocoa paste (about 2 tablespoon, see below for MOP on making paste). Mix until it looks like a uniform frosting without butter or cocoa lumps. Do not over mix, it should still feel smooth and spreadable.
Note: If making an Italian Meringue you do all the steps but adding the butter.

MOP: Chocolate paste
Add half of oil to a sauce pan. Heat until this becomes smokey hot. Add all of the cocoa to the saucepan, stir in.
Remove from heat when a paste starts to form, if you need to add more oil to make a paste then add the remaining 1/4th of the oil until paste is formed. Return to heat and add the remaining oil.
Remove from heat when its a thick liquid state, set aside (best over your preheated oven) until you are going to use it.
Formula*:
Italian meringue
8 oz. (100%) Sugar
2 oz. (25%) Water
4 oz. (50%) Egg whites
12 oz. (150%) Butter, soft and cubed (large marshmallow size)
2 oz. (25%) Emulsified shortening (or additional butter)
0.08 oz. (1/2t) (1%) Lemon juice**
0.12 oz. (3/4t) (1.5%) Vanilla extract
Chocolate paste****.
16 oz. Oil
2 lbs cocoa
*This formula is modified from Gisslen, Professional Baking, Ed. 5, Pg. 426
** Can substitute with lime juice or cream of tartar
***This yields enough for 40ish cakes, it is a 2:1 ratio. Adjust according to what you think you will use.
MOP: Italian chocolate meringue butter cream
 In sauce pan combine sugar and water, mix until incorporated. Turn heat on high and stir over heat until it reaches 240 degrees Fahrenheit. You can either test for doneness with your thermometer or by making a soft ball with your fingers, make sure your hands are clean!
To do this place your hands in ice water until its cold and then dip your fingers in the sugar and immediately dip your fingers back in the ice water. Press your fingers together to make a ball out of the sugar. If a soft ball forms in your fingers it is at 240 degrees.
While that is heating up add your egg whites and lemon juice together into your mixers bowl. Do not combine these two while scaling if you are going to leave out for a while, the acid in the lemon will start to cook the egg whites. When your sugar mixture starts to boil start mixing your egg whites with a whisk attachment. Start on low speed and increase to high until egg whites are foamy.
 |
| This butter cream needs to still be scraped down to incorporate the butter and the cocoa paste |
Note: If making an Italian Meringue you do all the steps but adding the butter.

MOP: Chocolate paste
Add half of oil to a sauce pan. Heat until this becomes smokey hot. Add all of the cocoa to the saucepan, stir in.
Remove from heat when a paste starts to form, if you need to add more oil to make a paste then add the remaining 1/4th of the oil until paste is formed. Return to heat and add the remaining oil.
Remove from heat when its a thick liquid state, set aside (best over your preheated oven) until you are going to use it.
Wednesday, January 19, 2011
Strawberry Genoise Cake
If cakes are measured by how long the name is and how delicious the cake is, then this one would deffinately fit the rule. I didnt want to just say strawberry cake because that brings up images of sheet cakes at Jewel into my mind. This cake is not the cake you would get at Jewel. We did a costing excersize on this cake and it turns out to be aproximately $3.24 per slice if you want to sell it and break even on product cost. That means that the cake would have to be roughly $32.00 to make you any sort of profit. I'll let you know on Thursday if its worth $32.00 taste wise.

Bravarian cream is a very time sensative cream. This makes the steps to this cake very important, its crucial that you have the cake set up before you make the cream. If you dont do this then the cream will start to get lumpy from sitting out and it will not fill smoothly at all when added to the cake.
Formula Yields: One 8" Strawberry Genoise Cake with Vanilla Bravarian Cream*
 Ingredients**:
0.75 oz. Sheet gelatin
approximately 5oz. Cold water
1 pt Heavy Cream
Simple Syrup
(The following ingredients make Creme anglaise: Bravarian Cream)
4 oz. Egg yolks
4 oz. Sugar
1 pt. Milk
0.25 oz. Vanilla
Tools:
Offset palette knife, serrated knife, pairing knife, rubber spatula or bowl scrapper, pastry brush, turntable, 7" template, 9" cake card, 8" mouse mold (ring), approximately 10" acetate (enough to line 8" mold), large bowl of ice, smaller stainless steel bowl to fit inside large ice bath, sauce pan, thermometer
 *This formula is from Gisslen, pg. 463
**This formula is from Gisslen, pg. 534
MOP: assemble
 First thing you want to do is take your frozen genoise cake out of the freezer, maybe an hour if you have that luxury, before you are going to use it. Remember that frozen cakes are harder to cut then chilled cakes. So what I'd do is take your cake out, scale your ingredients for the creme, wash your strawberries, get your cake boards and molds.
Take your genoise cake and cut it into 3 equal layers.
Take two of the layers (the third one you are not going to use, but can be used for cake crumbs or to put in a brownie batter, or you can use it to make smaller individual desserts if you have left over bravarian cream...). Using a 7" cake pan or template trim the two layers you are going to use down to 7" circles.
 Place the 8" ring on top of the 9" cake card, line the ring with acetate. Then put one of the cake layers in the middle of the 8" ring. Take your washed strawberries and cut off the tops, make sure to cut down to remove any white flesh as well. Slice the strawberries in half length wise. There should be a gap between your cake and the mold, place the strawberries in this gap with the cut side of the strawberry touching the acetate, and the bottom of the strawberries touching the cake card. Line the cake all the way around with strawberries. Dab the top of the cake with simple syrup and set aside for now.
Next you want to make your whip cream.
Take the 1 pt. (16 oz.) of heavy cream and whisk with with a wire whisk attachment in your mixer. Whisk to a soft peak, soft peak should look like the consistency of a milkshake, you'll be able to start seeing a whisk trail in the cream. Turn off mixer and place the cream in the refrigerator to set up, doesn't need to be covered.
Now that everything else is set up you can start to make the Creme anglaise. This is a creme that is used in a lot of different desserts. It is essentially a vanilla custard and is sometimes referred to as just custard or vanilla sauce.
Make sure you have a stainless steel bowl set up with an ice bath (ice and water). If you are using sheet gelatin place in a bowl with 5 oz of cold water (enough to cover it), start soaking to soften the gelatin. Heat 16 oz. of milk in a sauce pan, heat till it boils. While its heating you can start gently whisking your egg yolks and sugar in the smaller stainless steel bowl that you got out. Whisk this continuously but slowly other wise you run the risk of scrambling your eggs. When the milk boils remove it from the heat and half of the milk to the egg/sugar mixture. Whisk. When its incorporated add this mixture back into the saucepan, get a wooden spoon and bring the saucepan back to the heat. Mix with your wooden spoon, making sure to scrape the corners and bottom so the egg doesn't scramble while its heating up. Heat this until it reaches 180 degrees, no higher other wise the egg will start to cook.
Squeeze out the water from the gelatin while this is cooking. Place this into your smaller stainless steel bowl. Remove the saucepan from heat immediately when the creme reaches 180 degrees and pour over gelatin, mixing to melt the gelatin. Gelatin melts at around 100 degrees so it should melt immediately. Put this stainless steel bowl over an ice bath immediately to stop carry over cooking. You want to cool the creme/gelatin down to 55-60 degrees before you add the whip cream.
 You also don't want to leave the creme/gelatin for more then one minute though otherwise it will start to harden and get lumpy. Continue mixing until it reaches 55-60 degrees fahrenheit. Take your whip cream out of the refrigerator, grab a clean whisk so you don't run the risk of cross contamination from raw eggs. Temper the whip cream into the creme/gelatin mixture in three portions to avoid temperature shock, each time you pour the whip cream in whisking to incorporate. When its all mixed together use your spatula to clean off the sides. Immediately pour the finished creme anglaise into the cake mold so its just covers the tops of the
 strawberries. You can smooth it out to the edges using your spatula if you want. Place the second layer of cake on top of the creme anglaise. Push down gently to get out any air bubbles. Dab this layer of cake with simple syrup and then pour the rest of the cream on top, to the top of the mold. Use your offset spatula (or the straight side of your serrated knife), going back and forth over the top of the mold to flatten out the creme and to smooth out the top at the same time. Be careful you don't do this too many times because you will start to curdle the creme making it lumpy.
 Freeze the cake for a minimum of 3-4 hours to set the mouse (creme anglaise)
A note about this cake. If you are going to freeze a creme cake you would not want to idealy use fresh fruit in this manner. When you take the cake out of the freezer the fruit is immediately going to start sweating. If you want to incorporate fruit in this kind of cake you could mix the fruit in with the bravarian cream. If you wanted to still have the decorative fruit shapes along the outside you could use candied fruit, or dried fruit. Or just serve to eat in one sitting.


Bravarian cream is a very time sensative cream. This makes the steps to this cake very important, its crucial that you have the cake set up before you make the cream. If you dont do this then the cream will start to get lumpy from sitting out and it will not fill smoothly at all when added to the cake.
Formula Yields: One 8" Strawberry Genoise Cake with Vanilla Bravarian Cream*

0.75 oz. Sheet gelatin
approximately 5oz. Cold water
1 pt Heavy Cream
Simple Syrup
(The following ingredients make Creme anglaise: Bravarian Cream)
4 oz. Egg yolks
4 oz. Sugar
1 pt. Milk
0.25 oz. Vanilla
Tools:
Offset palette knife, serrated knife, pairing knife, rubber spatula or bowl scrapper, pastry brush, turntable, 7" template, 9" cake card, 8" mouse mold (ring), approximately 10" acetate (enough to line 8" mold), large bowl of ice, smaller stainless steel bowl to fit inside large ice bath, sauce pan, thermometer
 *This formula is from Gisslen, pg. 463
**This formula is from Gisslen, pg. 534
MOP: assemble
 First thing you want to do is take your frozen genoise cake out of the freezer, maybe an hour if you have that luxury, before you are going to use it. Remember that frozen cakes are harder to cut then chilled cakes. So what I'd do is take your cake out, scale your ingredients for the creme, wash your strawberries, get your cake boards and molds.
 Take your genoise cake and cut it into 3 equal layers.
Take two of the layers (the third one you are not going to use, but can be used for cake crumbs or to put in a brownie batter, or you can use it to make smaller individual desserts if you have left over bravarian cream...). Using a 7" cake pan or template trim the two layers you are going to use down to 7" circles.
 Place the 8" ring on top of the 9" cake card, line the ring with acetate. Then put one of the cake layers in the middle of the 8" ring. Take your washed strawberries and cut off the tops, make sure to cut down to remove any white flesh as well. Slice the strawberries in half length wise. There should be a gap between your cake and the mold, place the strawberries in this gap with the cut side of the strawberry touching the acetate, and the bottom of the strawberries touching the cake card. Line the cake all the way around with strawberries. Dab the top of the cake with simple syrup and set aside for now.
Next you want to make your whip cream.
Take the 1 pt. (16 oz.) of heavy cream and whisk with with a wire whisk attachment in your mixer. Whisk to a soft peak, soft peak should look like the consistency of a milkshake, you'll be able to start seeing a whisk trail in the cream. Turn off mixer and place the cream in the refrigerator to set up, doesn't need to be covered.
Now that everything else is set up you can start to make the Creme anglaise. This is a creme that is used in a lot of different desserts. It is essentially a vanilla custard and is sometimes referred to as just custard or vanilla sauce.
Make sure you have a stainless steel bowl set up with an ice bath (ice and water). If you are using sheet gelatin place in a bowl with 5 oz of cold water (enough to cover it), start soaking to soften the gelatin. Heat 16 oz. of milk in a sauce pan, heat till it boils. While its heating you can start gently whisking your egg yolks and sugar in the smaller stainless steel bowl that you got out. Whisk this continuously but slowly other wise you run the risk of scrambling your eggs. When the milk boils remove it from the heat and half of the milk to the egg/sugar mixture. Whisk. When its incorporated add this mixture back into the saucepan, get a wooden spoon and bring the saucepan back to the heat. Mix with your wooden spoon, making sure to scrape the corners and bottom so the egg doesn't scramble while its heating up. Heat this until it reaches 180 degrees, no higher other wise the egg will start to cook.
Squeeze out the water from the gelatin while this is cooking. Place this into your smaller stainless steel bowl. Remove the saucepan from heat immediately when the creme reaches 180 degrees and pour over gelatin, mixing to melt the gelatin. Gelatin melts at around 100 degrees so it should melt immediately. Put this stainless steel bowl over an ice bath immediately to stop carry over cooking. You want to cool the creme/gelatin down to 55-60 degrees before you add the whip cream.


A note about this cake. If you are going to freeze a creme cake you would not want to idealy use fresh fruit in this manner. When you take the cake out of the freezer the fruit is immediately going to start sweating. If you want to incorporate fruit in this kind of cake you could mix the fruit in with the bravarian cream. If you wanted to still have the decorative fruit shapes along the outside you could use candied fruit, or dried fruit. Or just serve to eat in one sitting.

Sunday, January 16, 2011
Sachertorte
As I described in a previous post, a Sachertorte is a kind of cake that originated in the Hotel Sacher in the late 17th century.
Sachertorte: Yields 1, 10" cake
Ingredients:
1, 10" Baked and chilled Sacher cake
Simple syrup flavoured with Kirsch (this recipe usually uses a run or raspberry flavoured liquor)
Raspberry jam (can use other flavours, in the Gisslen text it says to use apricot)
Gnache
Praline
Tools: offset palette knife (offset spatula), serrated knife, pastry brush, 10" cake card, 12" decorative cake card (for presentation), half sheet pan, wire rack that fits inside sheet pan, parchment paper, parchment paper to make a decorating cone, turntable

MOP: assemble
Take the 10" Sacher cake out of the freezer, if the cake is cold but not frozen it will be easier to cut.
Make gnache. Gnache is usually equal parts chocolate and heavy cream. Place chocolate, cut up to small pieces, in a stainless steel bowl. Heat the cream over a burner until it is hot and steamy, not boiling. If you are using a cream that is of a higher percentage then you dont need to heat it up so much. When it is hot, pour cream over chocolate and mix with a spoon not with a whisk (whisks incorporate air). Let it sit before using it.
Unwrap the cake and place it on a 10" cake card on the turntable, upside down. Trim cake if it is not level. Slice the cake in half (the best way to do this is keep your serrated knife level and spin the turn table. That way you decrease your chances of cutting in a crooked line.) aSet the other half of the cake aside for now.
Use a pastry brush to generously dab the simple syrup mixture on the cake. This aides in moistening the sponge (cake) layer. (See Black Forest Cake entry for instructions on how to make simple syrup).
 Place a generous portion (about 6 oz.) of the raspberry jam in the center of the cake, using your offset spatula spread the jam almost the the edge, leaving about half of an inch from the edge. The jam should not be too thickly put on either, about 1/4 inch thick. Put the other cake on top, gently push it down (the "cut" side should be facing down). Dab simple syrup on the top layer.
Now you want to do what is called a crumb coating or a masking. This can be done with different kinds of frosting, butter cream is often used. In this case we are just going to use the raspberry jam
 again. Dab another layer of jam on top and push to the edges, just like before. This time you want to only have a very thin layer, about 1/8th of an inch thick. Use a similar technique to the Black forest cake to frost the sides, dabbing a bit on in a straight vertical manner with your offset spatula and then gently dragging it back and forth. Clean off the edges and the top and put the cake in the freezer to set. Clean up your work area and set up a cooling rack inside of a parchment lined sheet pan.
Grab the gnache that you previously prepared and make sure it is still at a liquid consistency. If not, pop it in the microwave for a few seconds and take it out and stir it to get it to a pouring consistency.
Pour the gnache in to the middle of the cake, generously, and let it fall of the sides.
 As it begins to fall off the sides use your offset spatula to push the excess gnache away from the middle and allowing it to fall down the sides. You should not need to use the spatula on the sides, instead you can knock the pan against the table a few times to aide the gnache in flowing down the sides. This is why you want to use a lot of gnache, so it will fill down the sides of the entire cake.
If you don't get a complete covering you can do two things. You can take your offset spatula and try to fill in the cracks. Or you can pop the cake back in the freezer for 10 ish minutes and then pour another layer of gnache over the cake. While this is very yummy and provides for a really chocolaty rich cake, its not the best solution production or money wise. This however is how I finished the cake in this picture and it was thoroughly delicious!
Let the cake set up.
To garnish the cake you can use either chocolate shavings (see Black Forest Cake posting for directions on how to make this) or you can use Croquant (rice grains) or Pralines (caramelized hazelnuts, like I did with this cake). Hold the cake with one hand, and with the other grab a bunch of pralines. With your open hand bring it to the cake and press gently off the bottom to form a semi circle. continue this all the way around the cake.

If you want to decorate the cake very traditionally make a parchment cone and fill with gnache. Write "Sacher" in the middle of the cake in your very best Cursive. You can also make a decorative swirly, yet uniform, boarder around the top of the cake as well. Lift the cake, with the cake card, off of the wire and place it on the larger cake card. Best served a little cold.

Eat with a loved one, or friend. They'll be very impressed (as will strangers on the bus or at the wine store if you are transporting it, and getting a bottle of red wine on the way).
Sachertorte: Yields 1, 10" cake
Ingredients:
1, 10" Baked and chilled Sacher cake
Simple syrup flavoured with Kirsch (this recipe usually uses a run or raspberry flavoured liquor)
Raspberry jam (can use other flavours, in the Gisslen text it says to use apricot)
Gnache
Praline
Tools: offset palette knife (offset spatula), serrated knife, pastry brush, 10" cake card, 12" decorative cake card (for presentation), half sheet pan, wire rack that fits inside sheet pan, parchment paper, parchment paper to make a decorating cone, turntable

MOP: assemble
Take the 10" Sacher cake out of the freezer, if the cake is cold but not frozen it will be easier to cut.
Make gnache. Gnache is usually equal parts chocolate and heavy cream. Place chocolate, cut up to small pieces, in a stainless steel bowl. Heat the cream over a burner until it is hot and steamy, not boiling. If you are using a cream that is of a higher percentage then you dont need to heat it up so much. When it is hot, pour cream over chocolate and mix with a spoon not with a whisk (whisks incorporate air). Let it sit before using it.
Unwrap the cake and place it on a 10" cake card on the turntable, upside down. Trim cake if it is not level. Slice the cake in half (the best way to do this is keep your serrated knife level and spin the turn table. That way you decrease your chances of cutting in a crooked line.) aSet the other half of the cake aside for now.
Use a pastry brush to generously dab the simple syrup mixture on the cake. This aides in moistening the sponge (cake) layer. (See Black Forest Cake entry for instructions on how to make simple syrup).

Now you want to do what is called a crumb coating or a masking. This can be done with different kinds of frosting, butter cream is often used. In this case we are just going to use the raspberry jam

Grab the gnache that you previously prepared and make sure it is still at a liquid consistency. If not, pop it in the microwave for a few seconds and take it out and stir it to get it to a pouring consistency.
Pour the gnache in to the middle of the cake, generously, and let it fall of the sides.

If you don't get a complete covering you can do two things. You can take your offset spatula and try to fill in the cracks. Or you can pop the cake back in the freezer for 10 ish minutes and then pour another layer of gnache over the cake. While this is very yummy and provides for a really chocolaty rich cake, its not the best solution production or money wise. This however is how I finished the cake in this picture and it was thoroughly delicious!
Let the cake set up.
To garnish the cake you can use either chocolate shavings (see Black Forest Cake posting for directions on how to make this) or you can use Croquant (rice grains) or Pralines (caramelized hazelnuts, like I did with this cake). Hold the cake with one hand, and with the other grab a bunch of pralines. With your open hand bring it to the cake and press gently off the bottom to form a semi circle. continue this all the way around the cake.

If you want to decorate the cake very traditionally make a parchment cone and fill with gnache. Write "Sacher" in the middle of the cake in your very best Cursive. You can also make a decorative swirly, yet uniform, boarder around the top of the cake as well. Lift the cake, with the cake card, off of the wire and place it on the larger cake card. Best served a little cold.

Eat with a loved one, or friend. They'll be very impressed (as will strangers on the bus or at the wine store if you are transporting it, and getting a bottle of red wine on the way).
Black Forest Cake
This is an assembled cake. We have to start thinking about how we are going to put all of our information in a concise portfolio at the end of the quarter, so maybe if I start to construct this blog with some of the same ideas in mind I wont have to do a lot of editing come March. So for this cake we used the cake from the two stage method (Devil Food Cake)
 Black Forest Cake: Yields 1 9" cake
Ingredients:
1 9" Devil Food Cake
16 oz. Heavy Cream
3 (ish) oz. Sugar*
Simple syrup
Kirsch, or other liquor
Cherries
Dark chocolate shavings
Tools:
Piping bag, large star tip, offset palette knife (offset spatula), serrated Knife, bowl scrapper, pastry brush, turntable, 9" cake card, 10" or 12" decorative cake card (for presentation really)
*You want to use aproximately 20% of the cream amount for sugar
MOP: assemble
Make chantilly cream. In a mixing bowl using a whisk attachment whip the heavy cream and sugar to a medium to stiff peaks on high speed (8 on a Kitchenaide, 3 on a Hobart). Set aside when done.

Take the 9" devil food cake out of the freezer, unwrap it and place it on the turntable. Slice it in half (the best way to do this is keep your serrated knife level and spin the turn table. That way you decrease your chances of cutting in a crooked line.) If the cake is very uneaven you will want to trim off the top or bottom so that it is more flat. Turn the cake over so that the baked bottom is not the new "top", and place the new bottom half of the cake on the 9" cake card and on top of the turn table. Set the other half of the cake aside for now.
 Use a pastry brush to generously dab the simple syrup mixture on the cake. This aides in moistening the sponge (cake) layer.
The simple syrup mixture can be any combination of 1pt sugar to 1 part water (eg. 1qt water to 2# sugar), plus you can add a little bit of liquor to give it flavouring. Using the liquid from a canned fruit container is also very sufficient and flavourful!
Fill your pastry bag with the Chantilly cream. Pipe three circles in the shape of a bullseye leaving room for a circle of fruit in between each circle; one around the edge, one closer in, one closer in.
 Fill in the empty portion in between each circle of cream with a line of cherries. Make sure to "dry" the cherries slightly on a towel or just by straining the liquid from the before hand, this will help you control the amount of liquid going into the cake.
Now take the "top" portion of the chocolate sponge cake that you had set aside earlier. You want to place it cut side down on top of the prepared cake. Press down gently on this layer to get everything to sit in place. Moisten this layer with simple syrup mixture just like before.
 With your offset spatula, take a generous portion of cream and place it in the middle of your cake. Moving from the middle to the edges with your spatula frost the top of the cake. Using your spatula so that it is at a slightly tilted angle from a flat position relative to the cake, place it in the middle of the cake and turn the turn table to flatten out the frosting on top.
To frost the sides of the cake, either hold the cake in your left hand or keep it on the turn table and apply the frosting to the sides thickly in a vertical swoop, do this again right next to the portion you just frosted.
 Then use your spatula to combine those frosted portions, in a back and forth motion. Continue in this fashion all the way around the cake.
When the cake is frosted, use your spatula at a flat angle to go around the sides and straighten it out, dont move your spatula but turn the turntable. Keep in mind that you want to have about a fourth inch thick wall of frosting around the sides of the cake to help keep the sponge cake moist.
 To flatten out the edges around the top of the cake take your spatula at a flat angle and come down from the top and pull up in the middle. As Chef Mark described, "Imagine an airplane coming in for a landing, and he sees a little kitty cat on the run way, and he's gotta take off. So you gotta come from the top and pull up. To miss that little kitty cat, you gotta pull up."
 Finish off the cake by decorating the tops and sides. Use your piping bag with the star tip to pipe 12 rosettes of whipped cream around the top edge, place a cherry in the center of each rosette. By doing this you are giving each slice of cake an embellishment.
Use the shaved chocolate to decorate the sides of the cake. If you cooled the chocolate you can easily use your hand to place it on the sides of the cake. You can also "dump" a generous amount of chocolate shaving in the center of the top of the cake.
 To make shaved chocolate:
Heat up dark chocolate in a stainless steel bowl on top of a water filled sauce pan. When the chocolate is at a thin melted consistency pour it on a very clean marble surface. Use your offset spatula to flatten the chocolate out to a very thin layer, let it dry. Use a bench scraper to score sections in the chocolate (if you want small shavings) and scrape the chocolate off the table with a quick pushing motion. Freeze the chocolate until you are going to use it to prevent it from melting or being too soft to apply to the cake.


Ingredients:
1 9" Devil Food Cake
16 oz. Heavy Cream
3 (ish) oz. Sugar*
Simple syrup
Kirsch, or other liquor
Cherries
Dark chocolate shavings
Tools:
Piping bag, large star tip, offset palette knife (offset spatula), serrated Knife, bowl scrapper, pastry brush, turntable, 9" cake card, 10" or 12" decorative cake card (for presentation really)
*You want to use aproximately 20% of the cream amount for sugar
MOP: assemble
Make chantilly cream. In a mixing bowl using a whisk attachment whip the heavy cream and sugar to a medium to stiff peaks on high speed (8 on a Kitchenaide, 3 on a Hobart). Set aside when done.

Take the 9" devil food cake out of the freezer, unwrap it and place it on the turntable. Slice it in half (the best way to do this is keep your serrated knife level and spin the turn table. That way you decrease your chances of cutting in a crooked line.) If the cake is very uneaven you will want to trim off the top or bottom so that it is more flat. Turn the cake over so that the baked bottom is not the new "top", and place the new bottom half of the cake on the 9" cake card and on top of the turn table. Set the other half of the cake aside for now.

The simple syrup mixture can be any combination of 1pt sugar to 1 part water (eg. 1qt water to 2# sugar), plus you can add a little bit of liquor to give it flavouring. Using the liquid from a canned fruit container is also very sufficient and flavourful!
Fill your pastry bag with the Chantilly cream. Pipe three circles in the shape of a bullseye leaving room for a circle of fruit in between each circle; one around the edge, one closer in, one closer in.

Now take the "top" portion of the chocolate sponge cake that you had set aside earlier. You want to place it cut side down on top of the prepared cake. Press down gently on this layer to get everything to sit in place. Moisten this layer with simple syrup mixture just like before.

To frost the sides of the cake, either hold the cake in your left hand or keep it on the turn table and apply the frosting to the sides thickly in a vertical swoop, do this again right next to the portion you just frosted.

When the cake is frosted, use your spatula at a flat angle to go around the sides and straighten it out, dont move your spatula but turn the turntable. Keep in mind that you want to have about a fourth inch thick wall of frosting around the sides of the cake to help keep the sponge cake moist.


Use the shaved chocolate to decorate the sides of the cake. If you cooled the chocolate you can easily use your hand to place it on the sides of the cake. You can also "dump" a generous amount of chocolate shaving in the center of the top of the cake.

Heat up dark chocolate in a stainless steel bowl on top of a water filled sauce pan. When the chocolate is at a thin melted consistency pour it on a very clean marble surface. Use your offset spatula to flatten the chocolate out to a very thin layer, let it dry. Use a bench scraper to score sections in the chocolate (if you want small shavings) and scrape the chocolate off the table with a quick pushing motion. Freeze the chocolate until you are going to use it to prevent it from melting or being too soft to apply to the cake.

Subscribe to:
Posts (Atom)